Ingredients
Equipment
Method
Prepare Dry Ingredients (Setting Up the Leavening System)
- In a large mixing bowl, whisk together 2 cups all-purpose flour, 2 tablespoons granulated sugar, 1 teaspoon baking powder, 1/2 teaspoon baking soda, and 1/2 teaspoon fine sea salt. Whisk thoroughly for 20-30 seconds to ensure the leavening agents (baking powder and baking soda) are evenly distributed throughout the flour. This is critical for uniform rise and consistent texture in your Blueberry Buttermilk Pancakes. Set this dry mixture aside while you prepare the wet ingredients.
Prepare Wet Ingredients (Room Temperature for Maximum CO2 Reaction)
- In a separate medium mixing bowl, whisk together 2 cups room-temperature buttermilk, 2 room-temperature eggs, 4 tablespoons melted and slightly cooled unsalted butter, and 1 teaspoon vanilla extract. Whisk just until combined and the mixture is smooth and uniform. IMPORTANT: Room temperature ingredients are essential. Cold buttermilk and eggs slow down the acid-base reaction between the buttermilk (lactic acid) and baking soda (sodium bicarbonate), reducing CO2 gas production and resulting in less fluffy pancakes. If your buttermilk and eggs are cold from the refrigerator, let them sit at room temperature for 30 minutes before mixing, or place the eggs (still in shells) in a bowl of warm water for 5 minutes to take the chill off.
Combine Wet and Dry (The Lumpy Batter Rule - Do NOT Overmix)
- Pour the wet ingredient mixture into the bowl of dry ingredients. Using a wooden spoon, rubber spatula, or whisk, stir gently and briefly—only 10 to 15 gentle strokes—just until the flour is mostly moistened. CRITICAL: Stop while the batter is still lumpy, rough, and uneven-looking. You should see small pockets of dry flour throughout, and the batter should look like it barely came together. This is correct and intentional. Do NOT continue stirring to make the batter smooth. A smooth batter means you have overdeveloped gluten (the protein network formed when flour proteins glutenin and gliadin are hydrated and agitated), which will make your Blueberry Buttermilk Pancakes tough, chewy, and dense instead of tender and fluffy. The lumps are pockets of dry flour that will hydrate gently as the pancakes cook, creating the tender, cloud-like crumb you want. The moment you finish mixing, you will see tiny bubbles forming on the batter surface—this is the buttermilk and baking soda reacting to produce CO2 gas. The clock is now ticking. You need to cook the batter immediately to capture that lift.
Fold in Blueberries (Preventing Sinking and Color Bleeding)
- If using FRESH blueberries: Gently fold 1 1/2 cups fresh blueberries into the batter using a rubber spatula. Fold carefully with just 3-4 strokes to avoid crushing the berries, which would release juice and turn the batter gray-blue. If using FROZEN blueberries: Place 1 1/2 cups frozen blueberries (do NOT thaw) in a small bowl and toss them with 1 tablespoon all-purpose flour until each berry is lightly coated. The flour coating creates a barrier that prevents the berries from sinking to the bottom during cooking and stops them from bleeding excessive juice as they thaw in the hot batter. This keeps your pancakes looking appetizing with distinct purple-blue berries instead of turning the entire batter a muddy gray-blue color. Gently fold the flour-coated frozen berries into the batter with just 3-4 strokes.
Preheat Griddle to Exact Temperature (375°F is the Sweet Spot)
- Heat a cast iron griddle or non-stick electric griddle over medium heat. If using an electric griddle, set the temperature dial to exactly 375°F (190°C). If using a stovetop griddle or large skillet, let it preheat over medium heat for 5-7 minutes to ensure even heat distribution. Test the temperature by flicking a few drops of water onto the surface. The water should sizzle immediately, form dancing droplets that skitter across the surface, and evaporate completely within 2-3 seconds. If the water just sits and slowly steams, the griddle is too cold (pancakes will be pale and dense). If the water evaporates instantly in a violent hiss with no dancing, the griddle is too hot (pancakes will burn on the outside and stay raw inside). 375°F is the precise temperature that cooks the interior through while creating a golden-brown, slightly crisp exterior. Once at the correct temperature, lightly grease the griddle with a small pat of butter or a light spray of neutral oil (canola or vegetable oil). Wipe off any excess with a paper towel—you want just a thin, invisible coating. Too much grease makes the pancakes greasy instead of fluffy.
Pour and Watch for Bubbles (Timing the First Flip)
- Using a 1/3-cup measuring cup or ladle, pour the batter onto the hot greased griddle, spacing pancakes about 2 inches apart to allow for slight spreading. Do NOT spread, smooth, or manipulate the batter with the cup—let it settle naturally into a thick, round shape. Thicker pancakes = fluffier final texture. Pour as many pancakes as will comfortably fit without crowding (usually 3-4 on a standard griddle). Now watch the surface carefully. Within 1-2 minutes, you will see small bubbles forming on the top surface of the pancakes as CO2 gas rises through the batter. Wait patiently until the bubbles POP and leave small holes, and the edges of the pancakes look set, dry, and slightly matte instead of wet and glossy. This usually takes 2-3 minutes on the first side. Resist the urge to flip early. Flipping before the bubbles pop means the center will stay gummy, wet, and undercooked. Be patient and wait for the visual cues.
Flip Once and Never Press (Preserving the CO2 Lift)
- When the bubbles have popped, the surface looks mostly set with just a few small moist spots remaining in the center, and the edges are golden-brown, slide a thin, wide spatula under each pancake and flip it in one smooth, confident motion. The second side cooks much faster than the first—only 1-2 minutes. You will see the pancake puff up dramatically as the heat causes the CO2 bubbles to expand to their maximum size. CRITICAL: Never press down on the pancakes with the spatula after flipping. Pressing squeezes out the CO2 gas you worked so hard to create through the buttermilk-baking soda reaction, and your Blueberry Buttermilk Pancakes will deflate and turn flat and dense. Let them cook completely undisturbed. When the second side is golden-brown and the pancake feels springy and firm (not squishy or wet) when gently pressed with your fingertip, transfer it to a serving plate or wire rack.
Repeat with Remaining Batter (Maintaining Consistent Temperature)
- Repeat the pouring, watching, and flipping process with the remaining batter. Add a tiny bit more butter or oil to the griddle between batches if needed, wiping off any excess. If you notice the griddle getting too hot (pancakes browning too quickly), reduce the heat slightly. If using an electric griddle, the temperature should stay consistent. If the batter thickens as it sits (which can happen as the flour continues to hydrate), you can gently stir in 1-2 tablespoons of buttermilk to loosen it slightly, but work quickly—the CO2 is escaping with every passing minute.
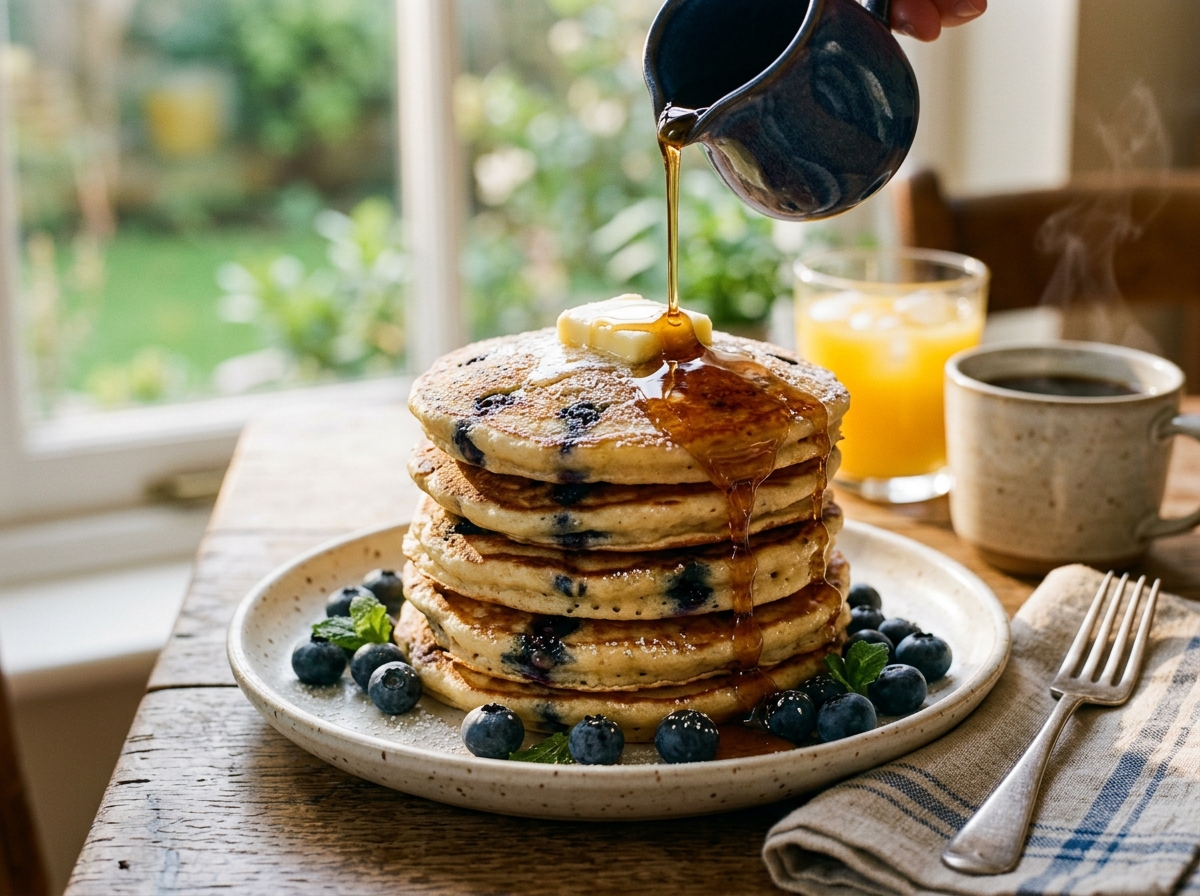
Serve Immediately (The Golden Stack Moment)
- Stack the Blueberry Buttermilk Pancakes 3-4 high on individual serving plates. Place a generous pat of unsalted butter on top of each stack and let it melt slowly, creating glossy golden rivers that run down the sides. Pour warm pure maple syrup generously over the stack, letting it pool between the layers and cascade down the edges. Scatter a handful of fresh blueberries around the plate for color, freshness, and visual appeal. Serve immediately while the pancakes are still hot, steaming, and at peak fluffiness. The interior should be so tender and cloud-like that it almost melts on your tongue, with bursts of sweet-tart blueberry throughout and a lightly crisp, golden-brown exterior.
Optional: Keep Warm While Cooking Remaining Batches
- If you want to serve everyone at the same time instead of in batches, preheat your oven to 200°F (93°C). As pancakes finish cooking, transfer them to a wire rack set over a baking sheet (do NOT stack them directly or they will steam and become soggy). Keep warm in the oven for up to 20 minutes while you finish cooking the remaining batter.
Notes
The Lumpy Batter Rule is Essential: This is the #1 secret to fluffy Blueberry Buttermilk Pancakes. Lumpy batter = minimal gluten development = tender, fluffy texture. Smooth batter = overdeveloped gluten = tough, chewy, dense pancakes. Stir only 10-15 strokes and stop while it still looks rough.
Room Temperature Ingredients Matter: Cold buttermilk and eggs slow down the acid-base reaction (lactic acid + sodium bicarbonate → CO2 gas). Room temperature ingredients react faster and produce more CO2 bubbles for maximum lift. Let cold ingredients sit out for 30 minutes before mixing.
Cook Batter Immediately: The buttermilk-baking soda reaction produces CO2 gas the moment they touch. If batter sits for more than 5 minutes before cooking, the gas escapes and you lose the lift. Always cook immediately after mixing for fluffiest results.
Frozen Blueberry Flour Trick: Tossing frozen berries in flour prevents them from sinking to the bottom and bleeding excessive juice that turns the batter gray-blue. Use berries straight from the freezer—do not thaw.
375°F is the Magic Temperature: Too hot (400°F+) = burnt outside, raw inside. Too cold (325°F or below) = pale, dense, flat pancakes. 375°F cooks the interior through while creating perfect golden-brown exterior.
Never Press After Flipping: Pressing squeezes out CO2 and deflates pancakes. Let them cook undisturbed.
Wait for Bubbles to Pop: This is your visual cue that the first side is done. Flipping too early = gummy, undercooked center.
Use Real Cultured Buttermilk: Milk + vinegar/lemon juice is a substitute, not the same thing. Real buttermilk has live cultures, deeper tangy flavor, and more consistent acid content for the CO2 reaction.
Why Blueberries Sometimes Turn Green: Anthocyanins (blueberry pigments) are pH-sensitive. Too much baking soda (too alkaline) turns them blue-green. Use exact recipe ratios—don't add extra baking soda.
Freezing for Meal Prep: Cool pancakes completely, place parchment between each, stack, wrap tightly in plastic + foil, freeze up to 2 months. Reheat from frozen in toaster or 350°F oven 8-10 min.