Ingredients
Equipment
Method
Step 1 - Thaw and Dry the Shrimp (The Foundation)
- If using frozen shrimp, thaw completely in refrigerator overnight OR place in colander under cold running water for 15 minutes. Once thawed, spread shrimp on layer of paper towels. Pat completely dry—surface moisture is enemy of good sear. Water must evaporate before shrimp can brown. If too much moisture, shrimp will steam instead of sear. The dry-pat technique is single most important prep step for 15-Minute Lemon Garlic Shrimp. Take your time. Press firmly. Get as dry as possible. Season shrimp on both sides with kosher salt and black pepper. Don't over-season—sauce will add plenty of flavor.
Step 2 - The High-Heat Sear (First Side)
- Heat 12-inch stainless steel skillet over MEDIUM-HIGH heat for 2 minutes. Add 2 tablespoons olive oil. When oil shimmers and flows easily across pan, it's ready. Add shrimp in single layer—don't overcrowd. If necessary, cook in two batches. You should hear immediate sizzle when shrimp hit pan—this is Maillard reaction beginning. DO NOT touch shrimp for 90 seconds. Let them sit undisturbed. Proteins on bottom surface are denaturing, contracting, forming golden-brown crust. If you move too early, you'll tear crust. After 90 seconds, shrimp should be pink on bottom and just beginning to curl. They will have released from pan naturally. If they stick, not ready—give another 30 seconds.
Step 3 - The Flip and Garlic Infusion
- Using tongs, flip each shrimp to second side. At this point, they should be forming 'C' shape—visual cue that they're approaching doneness. Immediately add 2 tablespoons butter to pan. As it melts, tilt pan slightly and use spoon to baste shrimp with melted butter. Now add minced garlic and red pepper flakes (if using). This timing is critical—garlic burns quickly. By adding after shrimp are flipped, you give it only 30-45 seconds direct heat—enough to bloom flavor but not burn. Stir garlic constantly for 30 seconds. You'll smell it immediately—sharp, aromatic punch that fills kitchen.
Step 4 - The Lemon Deglaze (Building the Sauce)
- Once garlic is fragrant (about 30 seconds), add ¼ cup dry white wine or chicken stock to pan. Liquid will immediately sizzle and steam. Use wooden spoon to scrape bottom of pan, loosening any browned bits (fond)—this fond is pure flavor. Add zest of 1 lemon directly to pan. Essential oils in zest are fat-soluble and will infuse into butter-oil mixture, adding bright, aromatic citrus notes. Squeeze juice of 1 lemon into pan. Acid will cut through richness of butter and balance sweetness of shrimp. Let sauce simmer 30 seconds to reduce slightly. Shrimp should now be fully pink and curled into perfect 'C' shape. Remove pan from heat immediately.
Step 5 - The Cold Butter Finish (Monter au Beurre)
- This is secret to restaurant-quality sauce. Remove pan from heat. Add remaining 2 tablespoons COLD butter to pan. Swirl pan gently, allowing residual heat to melt butter slowly. As butter melts, it emulsifies with lemon juice and pan juices, creating glossy, velvety sauce. Milk proteins in butter act as emulsifiers, binding fat and water into stable sauce. This technique is called monter au beurre (mounting with butter)—hallmark of French sauce-making. Adding cold butter off heat prevents sauce from breaking (separating into greasy puddles). Gentle, controlled melting creates smooth emulsion.
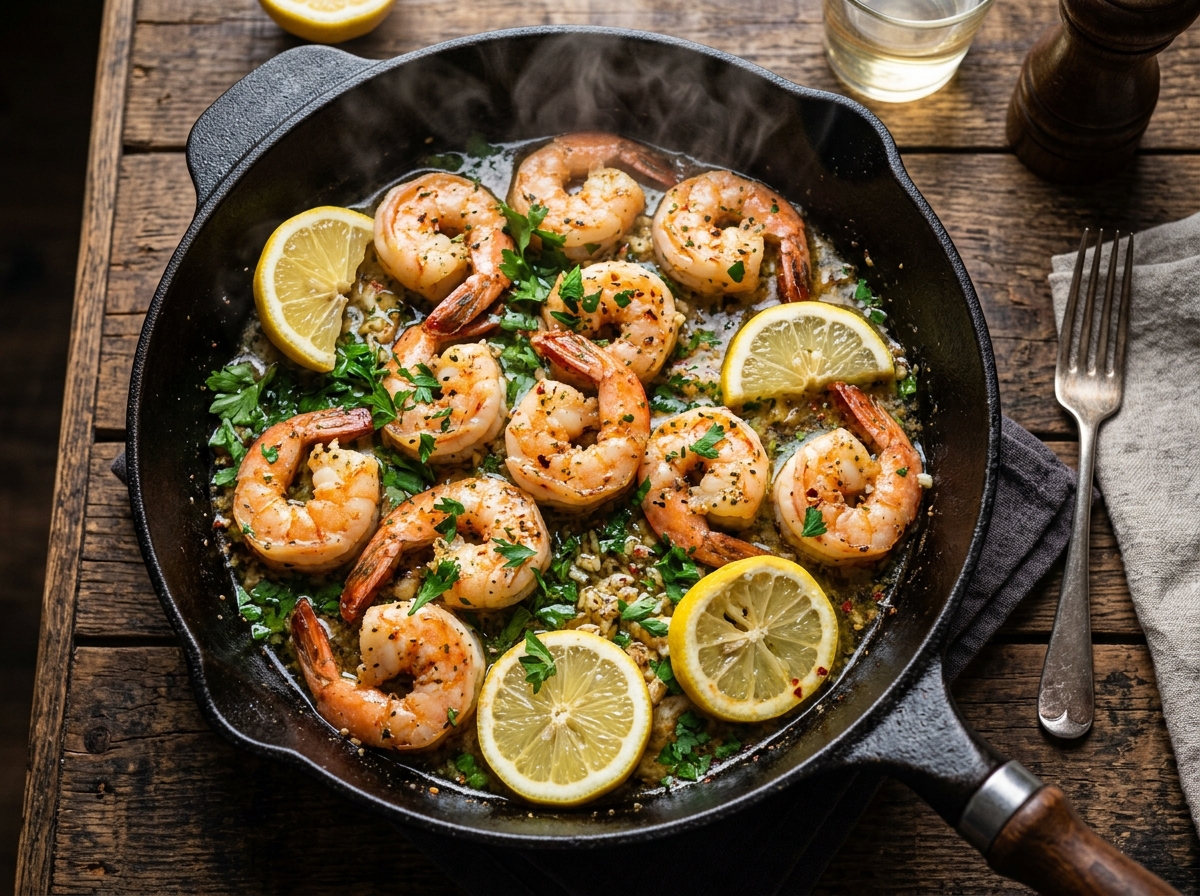
Step 6 - Garnish and Serve:
- Sprinkle chopped fresh parsley over shrimp. Parsley adds fresh, herbaceous note and pop of green color. Serve 15-Minute Lemon Garlic Shrimp immediately, spooning sauce over top. Shrimp should be tender, juicy, curled into 'C' shape. Sauce should be glossy and coat back of spoon. Serve with crusty bread (like Buttermilk Biscuits from Flavour Bazar) to soak up sauce, or over pasta, rice, or zucchini noodles. Best eaten fresh—shrimp don't reheat well.
Notes
**Critical Success Factors:** - Shrimp MUST be completely dry (pat with paper towels) - Pan MUST be hot (medium-high heat, oil shimmering) - Don't overcrowd pan (cook in batches if needed) - Don't move shrimp during first 90 seconds - Remove at 'C' shape (not 'O' shape) - Garlic added AFTER flip (prevents burning) - Cold butter added OFF heat (creates emulsion) **The C vs O Rule (CRITICAL):** - Raw shrimp: Straight or slightly curved - Perfect shrimp: 'C' shape (remove immediately) - Overcooked shrimp: Tight 'O' shape (rubbery, dry) - C is for Cooked, O is for Overcooked - Visual cue more reliable than timer **Science of Shrimp Cooking:** - Shrimp are almost entirely protein (myosin and actin) - Heat causes proteins to denature and coagulate - Proteins unwind, bond, squeeze out water - Overcooked = proteins contracted too tightly = dry - Residual heat continues cooking after removal from pan - Difference between tender and tough: 30 seconds **Butter Garlic Sauce Science:** - Emulsion: Stable mixture of fat (butter) and acid (lemon) - Milk proteins in butter act as emulsifiers - Monter au beurre: Mounting with butter (French technique) - Must add cold butter off heat (prevents breaking) - Result: Glossy, velvety sauce **Shrimp Selection:** - Best: Jumbo (16/20 count) = 16-20 per pound - Fresh vs frozen: Most 'fresh' are frozen-thawed - Buy frozen and thaw yourself = better quality - Look for IQF (individually quick frozen) - Sustainability: Wild-caught USA Gulf or MSC/ASC certified **Equipment:** - Stainless steel skillet BEST (better browning than non-stick) - 12-inch size accommodates 1.5 lbs without crowding **Timing:** - First side: 90 seconds undisturbed - Flip + garlic: 30-45 seconds - Deglaze + lemon: 30 seconds - Total: 2.5-3 minutes active cooking **Temperature:** - USDA safe: 145°F (63°C) - Remove at 'C': 120-130°F - After residual heat: 145°F **Storage (Not Recommended):** - Best eaten fresh - If must store: 2 days fridge max - Reheat gently: Stovetop low heat 1-2 min - DO NOT microwave