Best Air Fryer Whole Chicken: Perfect Juicy Roast in 85 Minutes
By Chef Mansoor | Flavour Bazar
The Golden Bird That Changed Sunday Dinner 🍗
The moment you lift that golden-brown chicken from the air fryer basket, you hear it. The skin crackles. Not just browns—it shatters. The surface glistens with rendered fat, caramelized to a deep mahogany that rivals any rotisserie chicken you have ever bought from the deli counter.
I have roasted hundreds of chickens. I have tested ovens, Dutch ovens, spatchcocking techniques, and even vertical roasters. But the Air Fryer Whole Chicken is the only method I have found that delivers rotisserie-level skin with a fraction of the time and energy. The concentrated convection in that small chamber does something ovens cannot replicate: it creates a continuous, high-velocity heat envelope that renders fat, evaporates moisture, and browns protein all at once.
This is not about convenience. This is about physics. When you roast an Air Fryer Whole Chicken, you are harnessing convection heat transfer at its most efficient. The result is crispy skin that stays crispy, juicy meat that stays juicy, and a bird that tastes like you spent all afternoon tending to it—when in reality, you spent fifty-five minutes doing almost nothing.
Let me show you exactly how it works, what to buy, and how to avoid the mistakes that turn a promising roast into rubbery disappointment.
Why Air Fryer Whole Chicken Beats the Oven 🔥
The science behind an Air Fryer Whole Chicken comes down to three things: heat transfer efficiency, moisture control, and fat rendering.
In a conventional oven, heat radiates from heating elements and rises passively. Hot air pools near the top. Cold spots form near the door. Your chicken roasts unevenly. The skin on top might crisp, but the underside steams against the roasting pan. You compensate by cranking the temperature or extending cook time, which dries out the breast meat before the thighs reach safe temperature.
An air fryer changes the equation entirely. The heating element sits directly above the basket. A powerful fan forces hot air downward and around the chicken at high velocity. This is forced convection, and it is far more efficient than natural convection in an oven.
The heat transfer rate in forced convection is governed by the convection coefficient—essentially, how fast moving air can strip heat into the surface of the food. In an air fryer, that coefficient is significantly higher because air is moving faster. This means the surface of your Air Fryer Whole Chicken heats up quickly, triggering the Maillard reaction and fat rendering almost immediately.
Here is the relationship between surface crispness and airflow:
In simple terms: faster air movement means faster moisture evaporation. Less moisture on the surface means more crispness. The air fryer maximizes the numerator (velocity) and minimizes the denominator (moisture), giving you the crispest possible skin.
But there is a second factor: the fat layer under the skin. When exposed to high heat, that subcutaneous fat melts and seeps outward, essentially basting the skin from the inside. In an air fryer, this rendered fat does not pool at the bottom of a pan—it drips through the basket and away from the bird. What remains on the surface fries the skin in its own fat, creating that rotisserie-style crunch.
This is why an Air Fryer Whole Chicken achieves results that feel impossible. You are not just roasting. You are simultaneously roasting, frying, and dehydrating the skin while keeping the interior moist through even, rapid cooking.

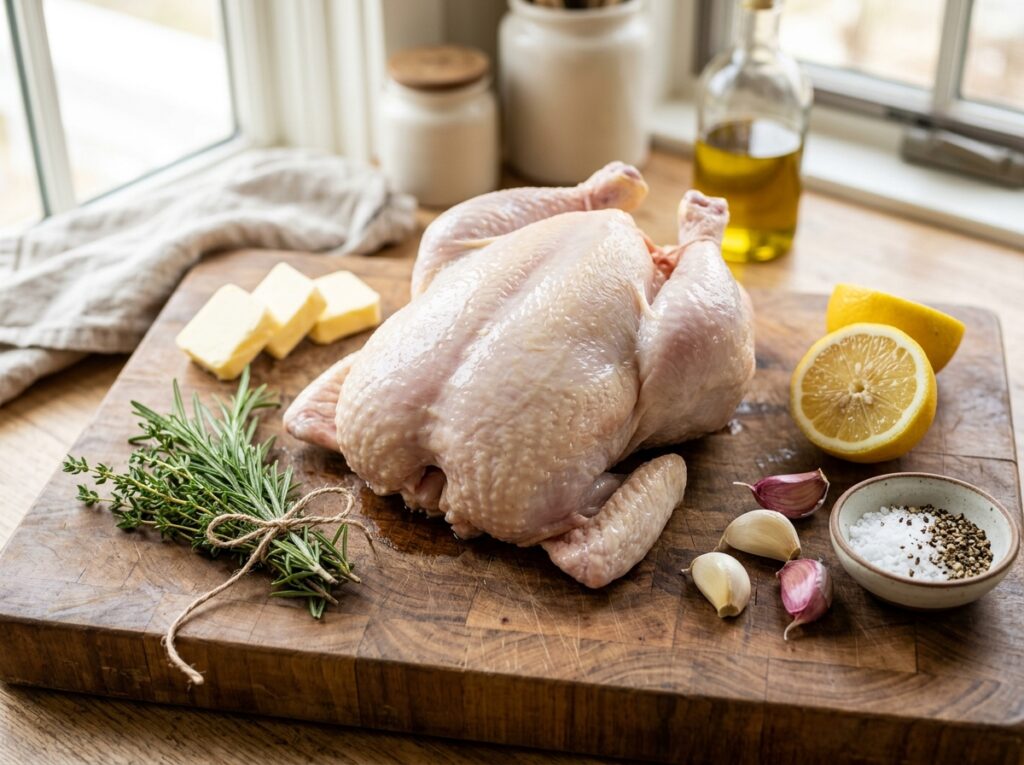
What to Buy and Where to Find It 🛒
Not all chickens are created equal, and the air fryer will expose every shortcoming. Here is what to buy for the best Air Fryer Whole Chicken.
Best Chicken to Buy:
Start with a Perdue Oven Stuffer Roaster or Bell & Evans Air-Chilled Chicken. Both brands are available at most USA grocery stores, including Kroger, Walmart, and Whole Foods. The key is “air-chilled.” Most supermarket chickens are water-chilled, which means they absorb water during processing. That water dilutes flavor and creates excess moisture that prevents crisping.
Bell & Evans air-chilled chickens are processed without water immersion. The skin is drier from the start, which means faster crisping. Perdue’s Oven Stuffer line has a higher fat content, which gives you more flavor and better skin rendering.
Size Matters: Look for a bird between 3.5 to 4.5 pounds (1.6 to 2 kg). Anything larger will not fit comfortably in most air fryer baskets. If you have a larger model like the Ninja Foodi 8-Quart, you can push to 5 pounds, but I recommend staying smaller for even cooking.
Fat and Seasoning:
Use Kerrygold Salted Butter for rubbing under and over the skin. The high butterfat content (82% vs. 80% in American butter) means more flavor and better browning. You can find it at Target, Whole Foods, and most Kroger locations.
For seasoning, Lawry’s Seasoned Salt is my go-to. It has the perfect balance of salt, garlic, paprika, and sugar. The sugar aids in caramelization, and the garlic powder toasts beautifully under high heat. If you want to make your own rub, combine kosher salt, garlic powder, onion powder, smoked paprika, and black pepper.
Aromatics:
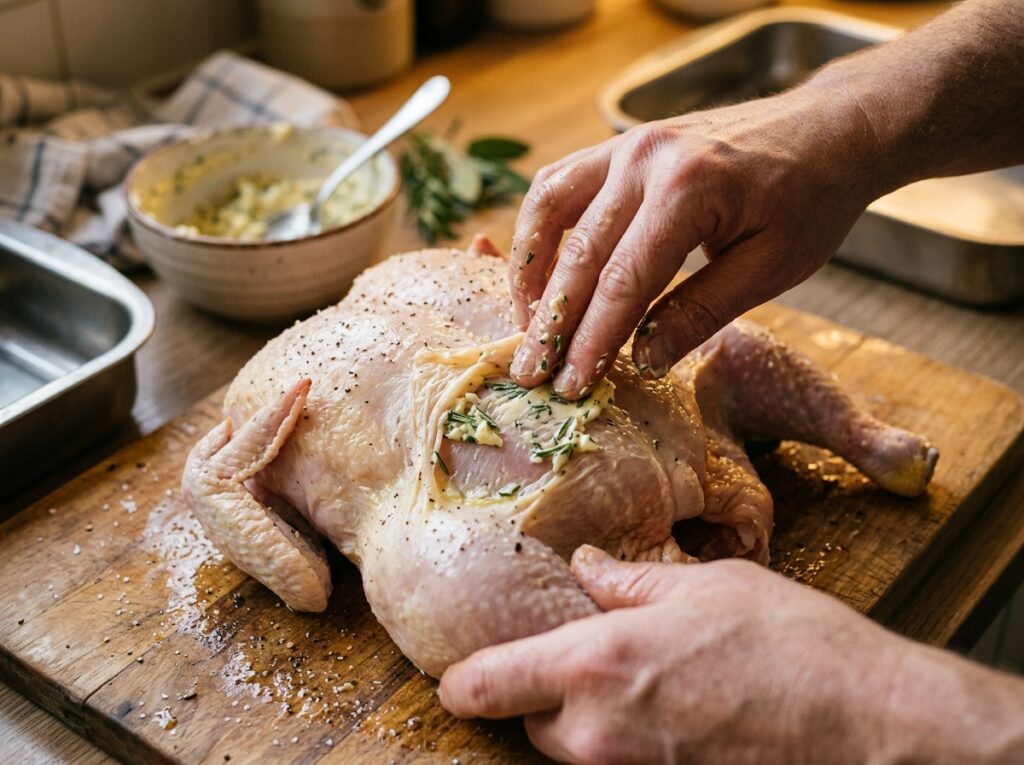
Stuff the cavity with a halved lemon, a few smashed garlic cloves, and fresh thyme or rosemary. Whole Foods and Trader Joe’s carry fresh herb bundles. The aromatics do not penetrate the meat much, but they perfume the fat that renders out, which subtly flavors the skin.
Temperature Monitoring:
Invest in a Meater Plus wireless thermometer. It is a single-probe, wireless device that monitors internal temperature in real time and sends alerts to your phone. This eliminates guesswork. Insert it into the thickest part of the thigh (not touching bone), and pull the chicken when it hits 160°F (71°C) in Air fryer. Carryover cooking will bring it to the USDA-safe 165°F (74°C).
Air Fryer Recommendations:
The Ninja Foodi 8-Quart and Cosori Pro II 5.8-Quart both have enough height and width to accommodate a whole chicken. The Ninja has a slightly more powerful fan, which gives you crispier skin. If you are using a smaller basket model, you may need to spatchcock the bird or cook in halves.
Ingredients 📝
| Ingredient | US Customary | Metric |
|---|---|---|
| Whole chicken (air-chilled preferred for Air Fryer) | 1 chicken (3.5–4.5 lbs) | 1 chicken (1.6–2 kg) |
| Salted butter, softened | 3 tablespoons | 45g |
| Lawry’s Seasoned Salt | 1½ tablespoons | 20g |
| Black pepper, freshly ground | 1 teaspoon | 3g |
| Garlic powder | 1 teaspoon | 3g |
| Smoked paprika | 1 teaspoon | 3g |
| Olive oil (for skin) | 1 tablespoon | 15ml |
| Lemon, halved | 1 lemon | 1 lemon |
| Garlic cloves, smashed | 4 cloves | 12g |
| Fresh thyme or rosemary sprigs | 3–4 sprigs | 3–4 sprigs |
Common Mistakes That Ruin Air Fryer Whole Chicken ❌
| The Mistake | What Actually Happens | The Fix |
|---|---|---|
| Not removing the giblets | Plastic bag melts inside the cavity, ruins the Air Fryer Whole Chicken | Always check the cavity and neck for giblet packets before cooking |
| Skipping the dry brine | Skin stays pale and rubbery, no crispy crackling develops | Pat skin completely dry, season 2–24 hours ahead, refrigerate uncovered |
| Tucking wings incorrectly | Wing tips burn and char before the rest of the chicken is done | Tuck wing tips behind the back or tie them close to the body |
| Ignoring the preheat | Chicken sticks to basket, skin tears when you try to remove it | Preheat air fryer to 360°F (182°C) for 5 minutes before adding chicken (Air Fryer Whole Chicken) |
| Overcrowding with a too-large bird | Air cannot circulate, bottom steams, skin stays flabby | Use a chicken no larger than 4.5 lbs; spatchcock if needed |
| Carving too soon | Juices run out onto the cutting board, meat dries out | Rest chicken for 15 minutes tented with foil before carving |
How to Roast Air Fryer Whole Chicken: Step-by-Step 👨🍳
Step 1: The Dry Brine
Remove the chicken from the package and check the cavity for giblets. Discard them or save for stock. Rinse the bird under cold water and pat it completely dry with paper towels. This is the most important step for crispy skin. Moisture is the enemy of the Maillard reaction.
Once dry, rub the entire surface—inside and out—with olive oil. This helps the seasoning stick and promotes even browning. In a small bowl, mix together the Lawry’s Seasoned Salt, black pepper, garlic powder, and smoked paprika. Sprinkle this rub generously over the entire chicken, including inside the cavity.
If you have time, refrigerate the seasoned chicken uncovered on a wire rack set over a baking sheet for 2 to 24 hours. This dry brine allows the salt to penetrate the meat and further dehydrates the skin. If you are cooking same-day, let it sit at room temperature for 30 minutes while you prep the aromatics.
Step 2: The Cavity Aromatics
Stuff the cavity with the halved lemon, smashed garlic cloves, and fresh thyme or rosemary sprigs. These aromatics will steam from the inside, perfuming the fat that renders out during cooking. They will not flavor the meat directly, but they add complexity to the skin and drippings, which you can use for gravy.
Step 3: Truss the Legs and Tuck the Wings
Use kitchen twine to tie the legs together loosely. This helps the chicken cook evenly and prevents the thighs from splaying open, which can cause uneven browning. Tuck the wing tips behind the back of the chicken so they do not char. If they are too long, you can tie them close to the body with twine.
Trussing a chicken is not just for looks. It creates a more compact shape, which promotes even heat distribution in the air fryer basket.
Step 4: Butter the Skin
Take the softened Kerrygold butter and gently loosen the skin over the breast and thighs by sliding your fingers between the skin and the meat. Spread a tablespoon of butter under the skin on each side. Rub the remaining butter over the outside of the skin. This creates a double layer of fat that will render and baste the chicken from both sides.
Step 5: Preheat the Air Fryer
Set your air fryer to 360°F (182°C) and preheat for 5 minutes. A hot basket prevents sticking and ensures the skin starts crisping immediately on contact.
Step 6: The First Roast (Breast-Side Down)
Place the chicken in the air fryer basket breast-side down. Yes, you read that right. Starting breast-down protects the delicate white meat from drying out while allowing the thighs (which need more time) to cook faster. The fat from the back and thighs drips down over the breast, keeping it moist.
Close the basket and roast for 25 minutes at 360°F (182°C). Do not open the basket during this time.
Step 7: The Flip
At 25 minutes, carefully flip the chicken breast-side up using tongs and a spatula. Be gentle—the skin is delicate at this stage. Once flipped, increase the temperature to 380°F (193°C) and roast for another 25 to 30 minutes in Air Fryer Whole Chicken.
This two-stage roasting method ensures even cooking. The lower temp at the start gently cooks the interior, while the higher temp at the end crisps and browns the skin.
Step 8: Check Internal Temperature
At the 50-minute mark, check your Air Fryer Whole Chicken with a thermometer. insert an instant-read thermometer into the thickest part of the thigh, avoiding the bone. You are looking for 160°F (71°C). If it has not reached that yet, continue cooking in 5-minute increments, checking each time.
Do not rely on visual cues alone. Chicken can look golden and perfect but still be undercooked inside. Always use a thermometer for juicy roast chicken.
Step 9: Rest and Carve
Once the Air Fryer Whole Chicken hits 160°F (71°C) in the thigh, remove it from the basket and transfer to a cutting board. Tent loosely with aluminum foil and let it rest for 15 minutes. During this time, carryover cooking will bring the internal temperature to 165°F (74°C), the USDA-safe minimum.
Resting allows the juices to redistribute throughout the meat. If you carve immediately, those juices will run out onto the board, leaving you with dry, stringy meat.
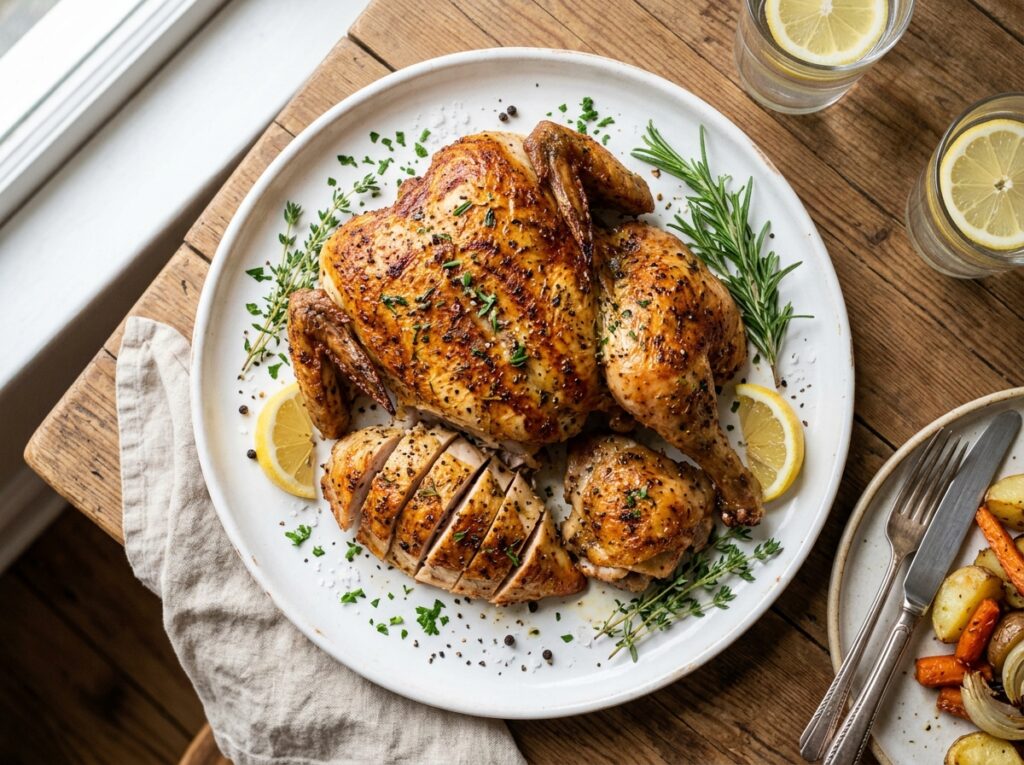
After resting, carve the chicken by removing the legs first, then the wings, then slicing the breast meat. Serve immediately while the skin is still crackling.
Enjoy your homemade Air Fryer Whole Chicken!”

Air Fryer Whole Chicken (The Perfect Sunday Roast)
Ingredients
Equipment
Method
- Remove chicken from package and check cavity for giblets. Discard or save for stock. Rinse under cold water and pat completely dry with paper towels—this is critical for crispy skin. Rub entire surface with olive oil. Mix Lawry’s Seasoned Salt, black pepper, garlic powder, and smoked paprika in a small bowl. Sprinkle generously over entire chicken, including inside the cavity. For best results, refrigerate uncovered on a wire rack over a baking sheet for 2–24 hours. For same-day cooking, let sit at room temp for 30 minutes.
- Stuff the cavity with halved lemon, smashed garlic cloves, and fresh thyme or rosemary sprigs. These will steam from inside, perfuming the rendered fat and adding complexity to the skin and drippings.
- Use kitchen twine to tie the legs together loosely. This helps even cooking and prevents thighs from splaying open. Tuck wing tips behind the back so they don’t char. If wings are too long, tie them close to the body with twine. Trussing creates a compact shape for even heat distribution.
- Gently loosen skin over breast and thighs by sliding fingers between skin and meat. Spread 1 tablespoon softened butter under the skin on each side. Rub remaining butter over outside of skin. This creates a double fat layer that renders and bastes from both sides.
- Set air fryer to 360°F (182°C) and preheat for 5 minutes. A hot basket prevents sticking and ensures skin starts crisping immediately on contact.
- Place chicken in air fryer basket breast-side down. Starting breast-down protects delicate white meat from drying while allowing thighs to cook faster. Fat from back and thighs drips over breast, keeping it moist. Close basket and roast for 25 minutes at 360°F (182°C). Do not open during this time.
- At 25 minutes, carefully flip chicken breast-side up using tongs and spatula. Be gentle—skin is delicate at this stage. Once flipped, increase temperature to 380°F (193°C) and roast for another 25–30 minutes. This two-stage method ensures even cooking: lower temp gently cooks interior, higher temp crisps and browns skin.
- At 50 minutes, insert instant-read thermometer into thickest part of thigh, avoiding bone. Look for 160°F (71°C). If not there yet, continue cooking in 5-minute increments. Always use a thermometer—visual cues alone are unreliable.
- Once chicken hits 160°F (71°C) in thigh, remove from basket and transfer to cutting board. Tent loosely with foil and rest for 15 minutes. Carryover cooking brings internal temp to safe 165°F (74°C). Resting redistributes juices—if you carve immediately, juices run out and meat becomes dry. After resting, carve by removing legs first, then wings, then slicing breast meat. Serve immediately while skin is crackling.
Notes
– Air fryer Stage 1: 360°F (182°C) for 25 min breast-down
– Air fryer Stage 2: 380°F (193°C) for 25-30 min breast-up
– Pull temp (thigh): 160°F (71°C)
– Final temp after rest: 165°F (74°C)
– Total cook time: 50-55 minutes **Chicken Selection:**
– Best brands: Perdue Oven Stuffer, Bell & Evans Air-Chilled
– Ideal size: 3.5–4.5 lbs (1.6–2 kg)
– Why air-chilled: No water absorption, drier skin, faster crisping
– Where to buy: Kroger, Walmart, Whole Foods, Target **Fat & Seasoning:**
– Butter: Kerrygold Salted (82% butterfat for better browning)
– Seasoning: Lawry’s Seasoned Salt or homemade blend
– Oil: Olive oil for initial rub **Critical Success Factors:**
– Pat skin completely dry before seasoning
– Preheat air fryer for 5 minutes
– Start breast-side down to protect white meat
– Flip at 25-minute mark for even browning
– Always use thermometer—check thigh temp
– Rest for 15 minutes before carving **Storage:**
– Refrigerator: 3-4 days whole or carved
– Freezer: 3 months carved and wrapped tightly
– Reheat: Air fryer at 350°F for 8-10 minutes **Leftover Ideas:**
– Chicken salad with mayo, celery, grapes, pecans
– Chicken tacos with taco seasoning and avocado
– Chicken noodle soup using carcass for stock
– Buffalo chicken dip with cream cheese and cheddar **Troubleshooting:**
– Skin not crispy: Pat drier, use air-chilled chicken, don’t skip preheat
– Breast dry: Start breast-down, don’t overcook past 165°F
– Uneven cooking: Use correct size chicken (max 4.5 lbs), flip at 25 min
– Sticking to basket: Always preheat, lightly oil basket if needed **Air Fryer Size:**
– Ninja Foodi 8-Quart: Fits up to 5 lb chicken
– Cosori Pro II 5.8-Quart: Fits up to 4.5 lb chicken
– Smaller baskets: Spatchcock chicken or cook in halves
Chef Mansoor’s Insight 💭
There is something sacred about the Sunday roast. It carries the weight of tradition, of family tables set with mismatched plates, of hands reaching for the crispiest piece. The Air Fryer Whole Chicken does not replace that tradition—it honors it. It takes the techniques our grandmothers knew by instinct and translates them through modern physics. The skin still crackles. The meat still pulls tender from the bone. The kitchen still smells like home. Technology, when used with respect, does not erase the old ways. It sharpens them. And on a quiet Sunday evening, when you pull that golden bird from the basket, you realize: the tools have changed, but the ritual remains. That is the magic.
— Chef Mansoor, The Flavor Bazaar
Nutrition Information (Per Serving) 📊
| Nutrient | Amount |
|---|---|
| Serving Size | 4 oz (115g) cooked chicken |
| Servings | 4–6 (depending on chicken size) |
| Calories | 285 kcal |
| Protein | 32g |
| Total Fat | 16g |
| Saturated Fat | 5g |
| Carbohydrates | 1g |
| Sodium | 520mg |
| Cholesterol | 110mg |
| Vitamin B6 | 20% DV |
| Niacin | 45% DV |
| Selenium | 35% DV |
Note: Nutrition values are estimates based on a 4 lb chicken with skin, seasoned with Lawry’s and butter. Values vary based on chicken size and whether skin is consumed.
Food Safety & Temperature Guide 🌡️
| Stage | Temperature |
|---|---|
| USDA Safe Minimum (Chicken) | 165°F / 74°C |
| Chef Mansoor Pull Temp (Thigh) | 160°F / 71°C |
| Final Temp After Resting | 165°F / 74°C |
| Breast Meat (Ideal Texture) | 155°F–160°F / 68°C–71°C |
| Danger Zone (Do Not Hold Food) | 40°F–140°F / 4°C–60°C |
| Air Fryer Cooking Temp (Stage 1) | 360°F / 182°C |
| Air Fryer Cooking Temp (Stage 2) | 380°F / 193°C |
Important: Always measure internal temperature in the thickest part of the thigh without touching bone. Carryover cooking adds 5–10°F after removal from heat.
Enjoy your homemade Air Fryer Whole Chicken!”
Storage & Reheating Guide 🥡
| Storage Method | Duration | Best Reheat Method |
|---|---|---|
| Refrigerator (whole, carved) | 3–4 days | Air fryer at 350°F for 8–10 minutes |
| Refrigerator (shredded for salad) | 3 days | Use cold in chicken salad with mayo, celery, grapes |
| Freezer (carved, wrapped tightly) | 3 months | Thaw in fridge, reheat in air fryer at 320°F |
| Room temperature (cooked) | Do not store | Consume within 2 hours or refrigerate |
Leftover Ideas:
- Chicken Salad: Shred leftover meat, mix with mayo, diced celery, red grapes, and toasted pecans
- Chicken Tacos: Shred and toss with taco seasoning, serve in tortillas with avocado
- Chicken Noodle Soup: Use the carcass to make stock, add shredded meat and vegetables
- Buffalo Chicken Dip: Shred meat, mix with cream cheese, buffalo sauce, and cheddar
Frequently Asked Questions ❓
Can I cook a frozen whole chicken in the air fryer?
No. A frozen chicken will not cook evenly. The outside will overcook and dry out before the inside thaws and reaches safe temperature. Always thaw chicken completely in the refrigerator (24–48 hours depending on size) before roasting.
Do I need to flip the chicken halfway through?
Yes. Starting breast-side down protects the delicate breast meat and allows the thighs to cook faster. Flipping at the 25-minute mark ensures the skin on the breast gets direct heat exposure for crisping. Without the flip, the breast skin stays pale and rubbery.
What if my air fryer is too small for a whole chicken?
If your basket is too small, spatchcock the chicken by removing the backbone and flattening it. This reduces height and allows the bird to fit in smaller baskets. Cook at the same temperatures but reduce time by about 10 minutes. Check internal temp at 40 minutes.
Can I use a different seasoning blend?
Absolutely. Any dry rub works. Try poultry seasoning, Italian herbs, Cajun spice, or even a simple salt-and-pepper combination. Just make sure to include salt for brining and sugar (in paprika or added separately) for caramelization.
How do I make gravy from the drippings?
The drippings collect at the bottom of the air fryer basket. Carefully pour them into a small saucepan. Add a tablespoon of flour and whisk over medium heat until it forms a roux. Slowly whisk in chicken stock until you reach desired consistency. Season with salt and pepper.
Why is my chicken skin not crispy?
The most common reasons are: not drying the skin thoroughly before seasoning, skipping the preheat, using a chicken that is too wet (water-chilled instead of air-chilled), or overcrowding the basket. Always pat dry, preheat, and use an appropriately-sized bird.
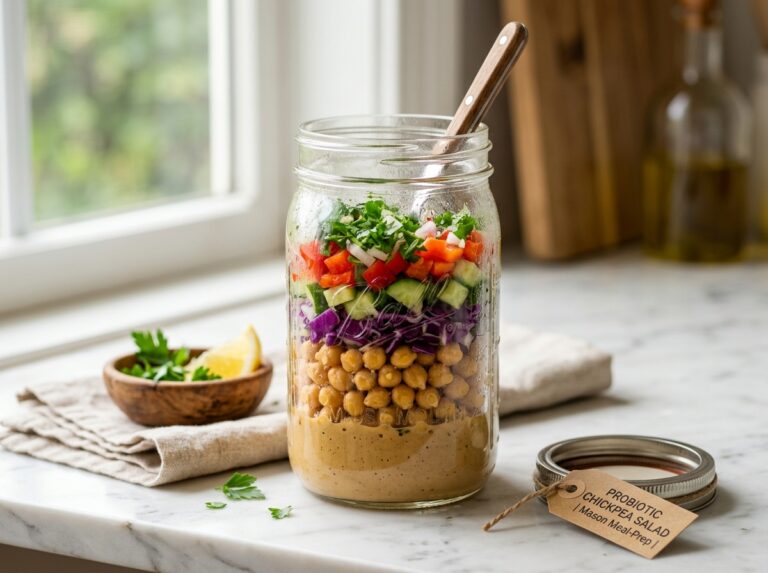
You Might Also Love These Recipes 🍽️
If you enjoyed mastering the science of Air Fryer Whole Chicken, here are a few more techniques and recipes from The Flavor Bazaar that will level up your Sunday dinner:
Best 20-Minute Crispy Air Fryer Brussels Sprouts with Garlic
Air Fryer Salmon: The Science of the Perfect 15-Minute Recipe
For More Recipes visit: Flavourbazar.com