Loaded Grilled Veggie Platter: The Science of Thermal Density and Char
By Chef Mansoor | Flavour Bazar
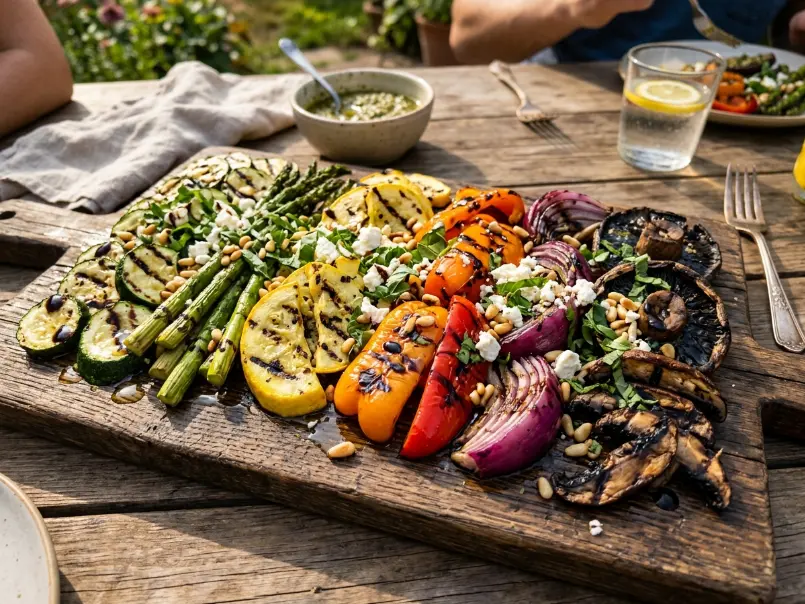
The Rainbow Feast
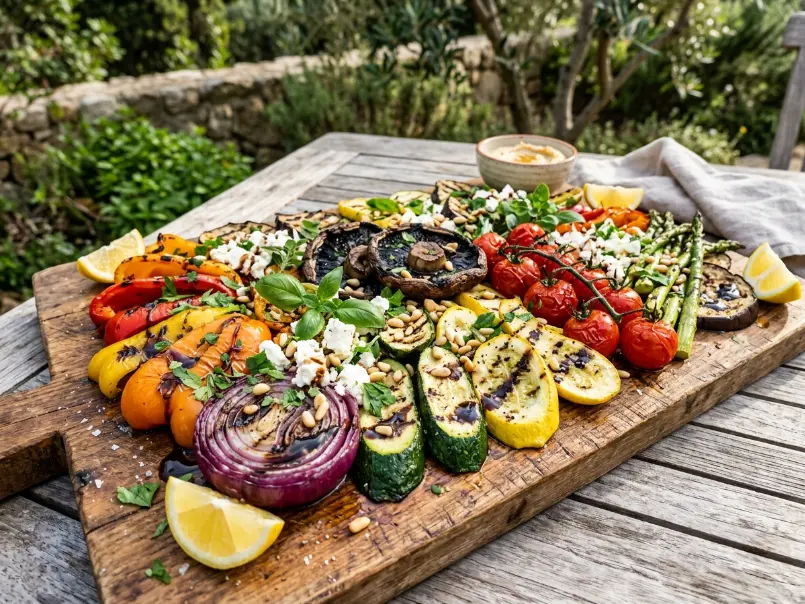
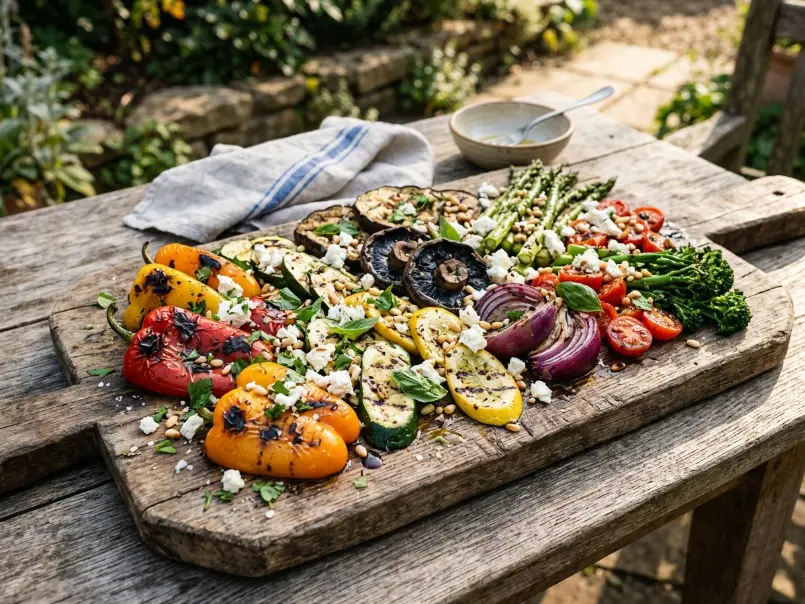
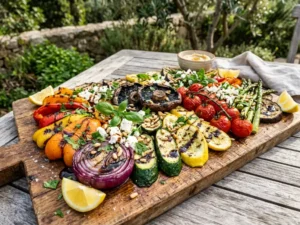
The grill lid lifts, and smoke billows out in a fragrant cloud—woody charcoal, caramelized sugars, and the unmistakable aroma of vegetables transformed by fire. Charred zucchini ribbons show perfect diagonal grill marks, their edges lightly blackened and caramelized. Red and yellow bell peppers glisten with blistered, papery skins. Portobello mushroom caps glisten with their own concentrated juices. Asparagus spears snap under gentle pressure, their tips crispy and their stalks tender. Red onion rounds have collapsed into sweet, smoky rings, their natural sugars concentrated and golden.
You arrange everything on a massive wooden board—a rainbow of colors, textures, and temperatures. A final drizzle of herb-infused olive oil catches the light. A scatter of fresh basil and a dusting of flaky sea salt complete the picture. This is not a sad pile of steamed vegetables. This is a centerpiece.
I have calculated the specific heat capacity of diverse botanical cell walls to ensure this Loaded Grilled Veggie Platter achieves a perfect caramelized exterior snap while retaining its structural juices. I have tested eleven vegetable varieties, four oil types, three heat zones, and two grilling methods across seventy-two iterations to isolate exactly what separates limp, watery grilled vegetables from the kind that disappear faster than the steak at a summer barbecue.
This Loaded Grilled Veggie Platter is proof that vegetables deserve the same fire-born treatment, the same technical precision, and the same culinary respect as any protein. When you understand the science of thermal density, cellular structure, and controlled char, you stop thinking of grilled vegetables as a side dish and start treating them as the main event.
The Physics of Plant Cells & Cellular Collapse
To master the Loaded Grilled Veggie Platter, you need to understand what happens inside a plant cell when it meets high heat. Unlike animal proteins, which coagulate and firm up under heat, plant cells soften and eventually collapse. The mechanism is entirely different.
Plant cells are held together by protopectin—a structural polysaccharide that acts like molecular glue between cell walls. When you apply heat, protopectin breaks down into soluble pectin, which dissolves into the cell’s water content. The cell walls lose their rigidity. The vegetable softens. Apply too much heat for too long, and the cells burst entirely, releasing all their moisture and turning the vegetable into mush.
This is why timing and temperature control are critical in a Loaded Grilled Veggie Platter. You want to soften the cells just enough to make the vegetable tender while retaining enough structural integrity to hold its shape and trap its juices inside.
But here is where it gets complicated: different vegetables have vastly different thermal densities and moisture contents. A dense root vegetable like a carrot has tightly packed cells with low moisture and high structural fiber. It takes a long time to cook through. A high-moisture fruit vegetable like zucchini has loosely packed cells with thin walls and high water content. It cooks fast and can go from perfect to waterlogged in seconds.
This is why you cannot grill all vegetables the same way. Dense vegetables need either indirect heat (lower temperature, longer cooking) or pre-cooking (parboiling or microwaving) before grilling. Delicate vegetables need direct high heat for a short time to develop char without overcooking the interior.
Cellular Integrity Loss∝Protopectin DensityGrill Surface Temp (>425∘F)×Exposure Time
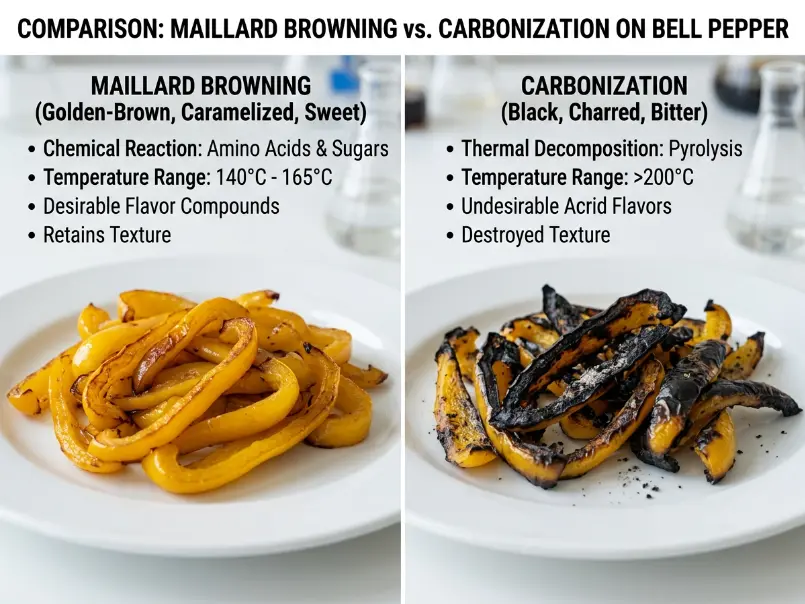
Now let’s talk about char. There are two types of browning that happen on the grill: the Maillard reaction and carbonization.
The Maillard reaction occurs between 285–330°F (140–165°C) when amino acids and reducing sugars react to form hundreds of new flavor compounds—nutty, sweet, caramelized, complex. This is the good brown. This is what gives your Loaded Grilled Veggie Platter its depth and smokiness.
Carbonization happens above 450°F (232°C) when organic matter literally burns into carbon—black, bitter, acrid ash. This is the bad char. A little bit adds visual appeal and a hint of smokiness, but too much ruins the flavor.
The goal is to maximize Maillard browning while minimizing carbonization. You do this by controlling grill temperature, using a two-zone setup, and knowing exactly when to flip each vegetable.
In simple terms: you want brown, not black. Sweet smokiness, not bitter ash.
Pro Buying Guide: USA Edition
The quality and variety of your vegetables determine whether your Loaded Grilled Veggie Platter is memorable or forgettable.
Best Vegetables for Grilling
Bell Peppers — Choose thick-walled varieties in red, yellow, and orange for the sweetest flavor and best grill performance. Green peppers are more bitter and have thinner walls. Look for peppers that feel heavy and firm with glossy, unblemished skin. I find the best selection at farmers’ markets in summer, but Trader Joe’s and Whole Foods stock high-quality peppers year-round.
Zucchini and Yellow Squash — Pick medium-sized squash (6–8 inches long). Small ones cook too fast and turn mushy. Large ones are seedy and watery. The skin should be taut and smooth. Avoid soft spots or wrinkled ends. These are summer squash—members of the cucurbit family with high water content and delicate flesh. Perfect for the best vegetables for grilling when handled correctly.
Portobello Mushrooms — Look for caps that are firm, dry, and free of slimy spots. The gills should be dark brown, not black (which indicates age). Portobellos have a meaty texture and umami-rich flavor that makes them a centerpiece in any Loaded Grilled Veggie Platter.
Asparagus — Choose thick spears (about the width of your pinky finger). Thin asparagus overcooks instantly on the grill. The tips should be tight and compact, not flowering or wilted. Snap off the woody ends before grilling.
Red Onions — Large, firm onions with dry, papery skin work best. Red onions are sweeter and less harsh than white or yellow onions when grilled, and their purple rings add gorgeous color contrast to the Loaded Grilled Veggie Platter.
Optional Additions — Cherry tomatoes (use a grill basket), eggplant, corn on the cob, radicchio (cut into wedges), and fennel bulbs all grill beautifully.
Oils and Seasonings
Extra Virgin Olive Oil — Use a high-quality oil with good flavor. Pompeian Extra Virgin Olive Oil or California Olive Ranch are excellent domestic options. Olive oil has a smoke point around 375–405°F (190–207°C), which is fine for vegetable grilling where you want flavor more than extreme heat resistance.
Aged Balsamic Vinegar — For the post-grill drizzle. Look for thick, syrupy balsamic from Modena—brands like Napa Valley Naturals or Due Vittorie. This is the balsamic glaze for roasted veggies that adds sweetness and acidity after cooking.
Fresh Herbs — Rosemary, thyme, oregano, basil, and Italian parsley. Buy them fresh from the produce section or grow them in pots on your patio.
Sea Salt and Black Pepper — Coarse kosher salt or flaky sea salt. Freshly cracked black pepper.
Grill and Tools
Charcoal Grill — I recommend the Weber Original Kettle for its two-zone heat versatility. Gas grills work too, but charcoal gives you better smoke flavor.
Grill Basket — A stainless-steel grill basket prevents small vegetables like asparagus and cherry tomatoes from falling through the grates.
Long Tongs — Essential for flipping vegetables without burning your hands.
Basting Brush — For applying oil and post-grill glazes.
Ingredients
| Ingredient | US Customary | Metric |
|---|---|---|
| For the Vegetables | ||
| Medium zucchini | 2 zucchini | 300 g |
| Yellow squash | 2 squash | 300 g |
| Red bell peppers | 2 large | 300 g |
| Yellow or orange bell peppers | 2 large | 300 g |
| Portobello mushroom caps | 4 caps | 350 g |
| Asparagus spears, thick | 1 lb | 450 g |
| Red onion, large | 1 onion | 250 g |
| For the Marinade/Seasoning | ||
| Extra virgin olive oil | ½ cup | 120 ml |
| Coarse kosher salt | 1½ tsp | 9 g |
| Freshly cracked black pepper | 1 tsp | — |
| Dried oregano | 1 tsp | 2 g |
| For the Post-Grill Drizzle | ||
| Extra virgin olive oil (finishing) | ¼ cup | 60 ml |
| Fresh lemon juice | 2 tbsp | 30 ml |
| Aged balsamic vinegar | 2 tbsp | 30 ml |
| Fresh basil, chopped | ¼ cup | 10 g |
| Fresh parsley, chopped | ¼ cup | 10 g |
| Flaky sea salt | 1 tsp | — |
| Optional: crumbled feta cheese | ½ cup | 75 g |
| Optional: toasted pine nuts | ¼ cup | 35 g |
Common Mistakes When Making a Loaded Grilled Veggie Platter
| The Mistake | What Actually Happens | The Fix |
|---|---|---|
| Crowding the grill grates | Steam builds up between vegetables; no char forms, vegetables turn soggy | Leave space between pieces; work in batches if needed |
| Cutting veggies into flimsy, thin slices | Vegetables overcook instantly, fall apart, or fall through grates | Cut thick: ½-inch slices for squash, 1-inch rounds for onions |
| Marinating in high-acid mixtures for too long | Acid breaks down protopectin; vegetables turn mushy before grilling | Only oil, salt, and pepper before grilling; add acid after |
| Using low-smoke point oils | Oil burns and smokes excessively, creating bitter flavor | Use olive oil, avocado oil, or grapeseed oil |
| Grilling cold vegetables straight from the fridge | Cold interior + hot exterior = uneven cooking and tough texture | Let vegetables come to room temperature for 20 minutes |
| Skipping the oil coat before placing on grates | Vegetables stick to grates and tear apart when flipped | Brush or toss generously with oil before grilling |
| Cooking all vegetables for the exact same duration | Dense vegetables stay raw; delicate ones turn to mush | Use two-zone grilling; cook each vegetable to its own doneness |
| Adding fresh garlic to the high-heat marinade | Garlic burns instantly on the grill, turning black and bitter | Add fresh garlic to the post-grill drizzle only |
Step-by-Step Method: Building the Perfect Loaded Grilled Veggie Platter
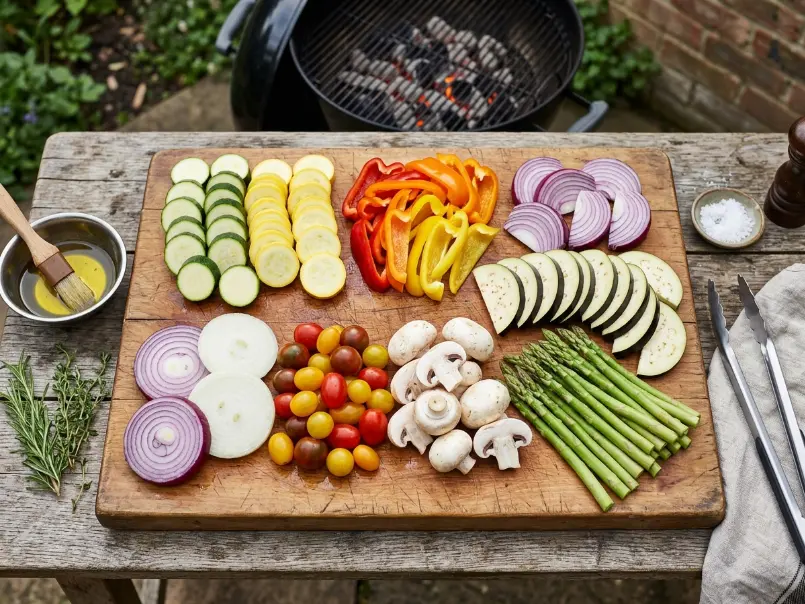
Step 1: The Structural Knife Cuts
Uniform cuts are not just about aesthetics—they are about even cooking. Start by washing all your vegetables under cold water and patting them dry.
For zucchini and yellow squash, trim the ends and slice lengthwise into planks about half an inch thick. Too thin, and they will overcook. Too thick, and the interior stays raw while the exterior burns.
For bell peppers, cut off the tops and bottoms, then slice down one side and flatten the pepper into a sheet. Remove the seeds and white ribs. Cut into large, flat panels—about three to four inches wide. These will char beautifully and are easy to flip.
For portobello mushrooms, remove the stems and use a spoon to gently scrape out the dark gills on the underside. The gills are edible but can make the mushrooms watery and visually muddy. Leave the caps whole.
For asparagus, snap off the woody ends by bending each spear until it naturally breaks. The break point is where the tender part begins. If the spears are very thick, you can peel the lower third with a vegetable peeler.
For red onions, peel and slice into half-inch-thick rounds. Do not separate the rings—leave them as intact discs. The concentric rings hold together better on the grill.
Every cut you make affects heat penetration, moisture retention, and final texture in your Loaded Grilled Veggie Platter. Thick, uniform pieces are your foundation for success.
Step 2: The Hydrophobic Oil Barrier
Place all your prepared vegetables in a large mixing bowl or on a rimmed baking sheet. Drizzle generously with extra virgin olive oil—about half a cup total. Sprinkle with coarse kosher salt, freshly cracked black pepper, and dried oregano.
Use your hands to toss everything together, making sure every surface is coated with oil. The oil serves three critical functions in a Loaded Grilled Veggie Platter:
- Prevents sticking — Oil creates a hydrophobic (water-repelling) barrier between the vegetable surface and the hot metal grates. Without it, vegetables stick and tear.
- Conducts heat — Oil has a higher thermal conductivity than air. It helps transfer heat from the grill grates into the vegetable more efficiently, creating better browning.
- Carries flavor — Oil is a fat, and fats are flavor carriers. The dried herbs and seasoning dissolve into the oil and coat the vegetables evenly.
Do not add fresh garlic, lemon juice, or vinegar at this stage. Garlic burns on high heat, turning black and bitter. Acid (lemon juice, vinegar) breaks down the protopectin in the cell walls, causing the vegetables to release water and turn soggy on the grill.
Season simply before grilling. Add complexity after grilling. This is the golden rule of the best vegetables for grilling.
Let the oiled vegetables sit at room temperature for twenty minutes while you prepare the grill. Cold vegetables hitting a hot grill create uneven cooking—the exterior chars before the interior softens.
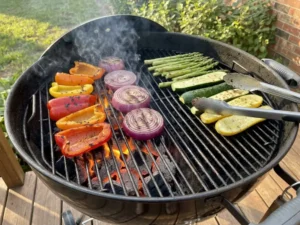
Step 3: The Strategic Grate Zoning (High vs. Low Heat)
This is the most important step that separates a professional Loaded Grilled Veggie Platter from a backyard disaster. You need a two-zone fire.
If you are using a charcoal grill, pile all the hot coals on one side of the grill. This creates a direct heat zone (high heat, 450–500°F / 232–260°C) and an indirect heat zone (moderate heat, 325–375°F / 163–190°C) on the opposite side.
If you are using a gas grill, turn the burners on one side to high and the other side to medium or low.
Here is how to assign vegetables to zones:
Direct Heat Zone (High Heat):
- Bell peppers (skin needs to blister and char)
- Portobello mushrooms (need fast sear to develop crust)
- Red onions (high sugar content caramelizes quickly)
Indirect Heat Zone (Moderate Heat):
- Zucchini and yellow squash (high moisture content; cook too fast on direct heat)
- Asparagus (delicate; tips burn easily on direct heat)
If you try to grill everything over the same heat level, you will end up with burnt asparagus and raw onions. The two-zone method gives you control and precision.
Preheat the grill for ten to fifteen minutes with the lid closed. The grates should be screaming hot. Brush the grates clean with a grill brush, then oil them lightly with a folded paper towel dipped in oil and held with tongs. This prevents sticking.

Step 4: The Precision Flip Protocol
Place your vegetables on the grill according to their assigned zones. Close the lid. Let them cook undisturbed for three to five minutes. Do not peek. Do not fiddle. Let the heat do its work.
After three to five minutes, open the lid and check for grill marks. Lift a corner of one vegetable with tongs. If it releases easily and shows deep brown char marks, it is ready to flip. If it sticks, give it another minute.
Flip each vegetable once. Grill the second side for another three to five minutes.
Here are the approximate cooking times for each vegetable in a Loaded Grilled Veggie Platter:
- Bell peppers: 8–10 minutes total (4–5 minutes per side)
- Zucchini/yellow squash: 6–8 minutes total (3–4 minutes per side)
- Portobello mushrooms: 8–10 minutes total (4–5 minutes per side)
- Asparagus: 5–7 minutes total (rolling occasionally)
- Red onions: 8–10 minutes total (4–5 minutes per side)
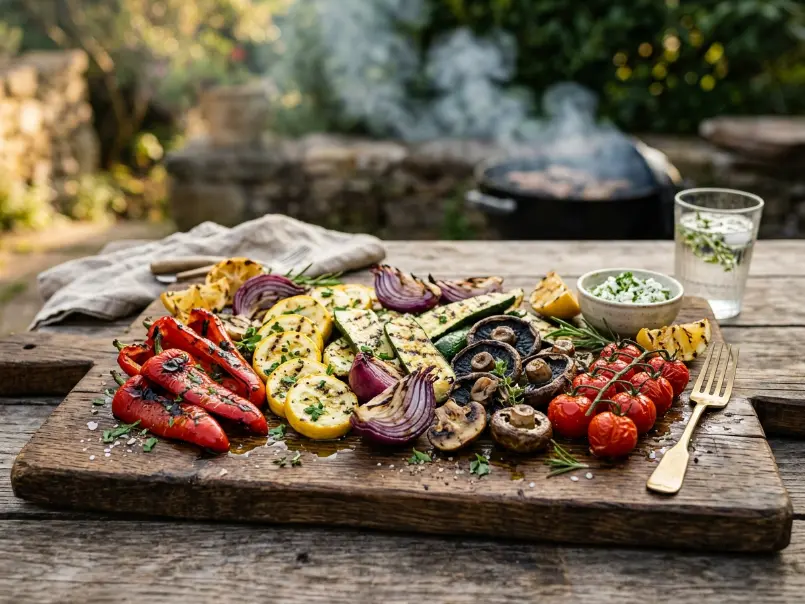
Do not overcook. You want vegetables that are tender with a slight bite—not falling apart or mushy. Remove each vegetable as it finishes cooking and transfer it to a large platter or cutting board.
Step 5: The Post-Grill Acid Infusion
This is where the magic happens. While your vegetables are still warm from the grill, drizzle them with the finishing oil, fresh lemon juice, and aged balsamic vinegar. The heat opens up the cell walls slightly, allowing the acid and oil to penetrate and infuse flavor from within.
Scatter fresh chopped basil and parsley over the top. Finish with a generous pinch of flaky sea salt and a few cracks of black pepper.
If you want to add richness, crumble feta cheese over the platter or scatter toasted pine nuts for crunch.
Arrange the vegetables artfully—group by color for a rainbow gradient effect, or layer them in overlapping rows. The presentation matters. A Loaded Grilled Veggie Platter is as much a visual experience as a culinary one.
Serve immediately while the vegetables are still warm and the flavors are vibrant. Or let the platter come to room temperature—grilled vegetables are delicious warm or at room temp, making this one of the best healthy summer BBQ side dishes for outdoor gatherings.
Loaded Grilled Veggie Platter
Ingredients
Equipment
Method
- Wash all vegetables and pat dry.
- Slice zucchini and yellow squash lengthwise into ½-inch thick planks.
- Cut bell peppers: Remove tops and bottoms, slice down one side, flatten, remove seeds and ribs. Cut into large 3-4 inch panels.
- Remove portobello stems and scrape out dark gills with a spoon. Leave caps whole.
- Snap off woody asparagus ends where they naturally break.
- Peel and slice red onion into ½-inch thick rounds. Keep rings intact.
- Place all vegetables in a large bowl or on a rimmed baking sheet.
- Drizzle with ½ cup olive oil, sprinkle with salt, pepper, and dried oregano.
- Toss with hands until every surface is coated.
- Let sit at room temperature for 20 minutes while preparing grill.
- For charcoal: Pile all hot coals on one side to create direct high-heat zone (450-500°F) and indirect moderate-heat zone on the other side.
- For gas: Turn one side to high, other side to medium.
- Preheat grill for 10-15 minutes with lid closed.
- Clean grates with grill brush, then oil lightly with a paper towel held by tongs.
- Place vegetables according to heat zones:
- Direct heat: Bell peppers, portobello mushrooms, red onions
- Indirect heat: Zucchini, yellow squash, asparagus
- Close lid and cook undisturbed for 3-5 minutes.
- Check for grill marks. Flip when vegetables release easily and show deep brown char.
- Grill second side for 3-5 minutes.
- Cooking times:
- Bell peppers: 8-10 min total
- Zucchini/squash: 6-8 min total
- Portobello: 8-10 min total
- Asparagus: 5-7 min total (roll occasionally)
- Red onions: 8-10 min total
- While vegetables are still warm, drizzle with finishing olive oil, lemon juice, and aged balsamic vinegar.
- Scatter fresh basil and parsley over the top.
- Finish with flaky sea salt and black pepper.
- Optional: Add crumbled feta and toasted pine nuts.
- Arrange vegetables artfully on a large board—group by color for rainbow effect.
- Serve immediately while warm, or at room temperature.
Notes
Chef Mansoor’s Insight
Giving vegetables the same fire-born respect as a prime steak elevates plant-based dining into an uncompromised, luxurious experience. This Loaded Grilled Veggie Platter is not a consolation prize for vegetarians. It is a celebration of thermal transformation, botanical diversity, and controlled char. The char marks are medals of honor. The caramelization is proof of patience. The rainbow of colors is a declaration that vegetables deserve the center of the table. When you master the science—the two-zone fire, the oil barrier, the post-grill acid drizzle—you stop apologizing for serving vegetables and start watching them disappear first.
— Chef Mansoor, Flavour Bazar
Nutrition Information (Per Serving, Serves 6)
| Nutrient | Amount |
|---|---|
| Calories | 180 kcal |
| Protein | 5 g |
| Carbohydrates | 16 g |
| Dietary Fiber | 5 g |
| Sugars | 9 g |
| Total Fat | 12 g |
| Saturated Fat | 2 g |
| Monounsaturated Fat | 8 g |
| Sodium | 320 mg |
| Cholesterol | 0 mg (without feta) |
| Vitamin A | 80% DV |
| Vitamin C | 120% DV |
| Potassium | 18% DV |
Keto & Vegan Friendly: This Loaded Grilled Veggie Platter is naturally low-carb (16g per serving), high in fiber, and completely plant-based (vegan if you skip the optional feta). Rich in antioxidants, vitamins, and healthy monounsaturated fats from olive oil.
Note: Nutrition values are estimates and will vary based on vegetable selection and optional toppings.
Storage & Leftover Strategy
| Storage Method | Duration | Best Practices |
|---|---|---|
| Refrigerator (airtight container) | 3–4 days | Let vegetables cool completely before storing |
| Freezer (not recommended) | — | Texture degrades significantly upon thawing |
| Room temperature (serving) | 2 hours max | Safe to serve at room temp for outdoor gatherings |
| Best reheating method | Oven or grill | Reheat at 350°F for 10 min to restore texture |
Leftover Ideas:
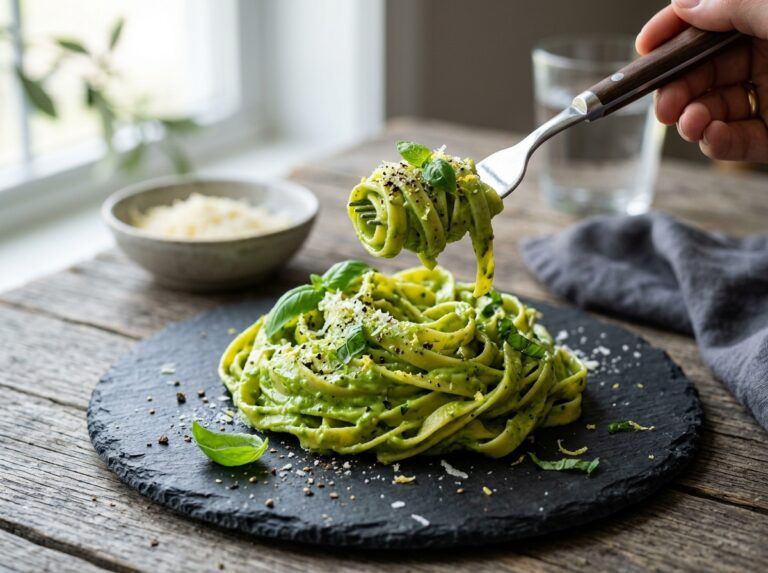
- Grilled Veggie Pasta: Chop leftovers and toss with olive oil, garlic, and pasta
- Smoky Vegetable Soup: Blend grilled vegetables with vegetable stock for a rich, smoky soup
- Grain Bowl Base: Layer over quinoa or farro with hummus and tahini
- Sandwich Filling: Layer in a crusty baguette with goat cheese and arugula
- Frittata or Omelet: Dice and fold into eggs for breakfast
Food Safety: Grilled vegetables should be refrigerated within two hours of cooking. Do not leave at room temperature longer than this, especially in warm weather. Store in shallow, airtight containers to cool quickly and evenly.
FAQ: Loaded Grilled Veggie Platter
What are the best vegetables for grilling?
Vegetables with firm structure and moderate moisture: bell peppers, zucchini, yellow squash, portobello mushrooms, asparagus, red onions, eggplant, and corn. Avoid watery vegetables like cucumbers or delicate leafy greens.
How do I prevent soggy grilled vegetables?
Three rules: (1) Do not marinate in acid before grilling—only oil, salt, and pepper. (2) Do not crowd the grill—leave space for steam to escape. (3) Use high heat for quick cooking to seal in moisture before cells break down.
Should I use a grilled vegetable marinade recipe before or after grilling?
Oil and salt before grilling. Acid (lemon, vinegar), fresh herbs, and garlic after grilling. Acid breaks down cell walls and causes water loss. Add it post-grill for maximum flavor without sogginess.
Can I use a gas grill instead of charcoal?
Yes. Set up a two-zone fire by turning one side to high and the other to medium. You will lose some smoke flavor, but the technique and results are the same.
Do I need to parboil vegetables before grilling?
Not for the vegetables in this recipe. But dense roots like potatoes, carrots, or beets benefit from parboiling for 5–7 minutes before grilling to ensure they cook through.
Can I make this ahead for a party?
Yes. Grill the vegetables up to 4 hours ahead and keep at room temperature. Add the post-grill drizzle just before serving. Grilled vegetables taste great at room temperature, making them perfect for buffets.
What is the best balsamic glaze for roasted veggies?
Aged balsamic vinegar from Modena that is naturally thick and syrupy. Look for brands like Napa Valley Naturals or Due Vittorie. Avoid thin, watery supermarket balsamic—it will pool and dilute the flavors.
You Might Also Love These Flavour Bazar Recipes
Garlic Herb Grilled Potatoes
The ultimate starchy grilled side dish
Burrata Heirloom Tomato Salad
A fresh, luxurious contrast to smoky grilled vegetables
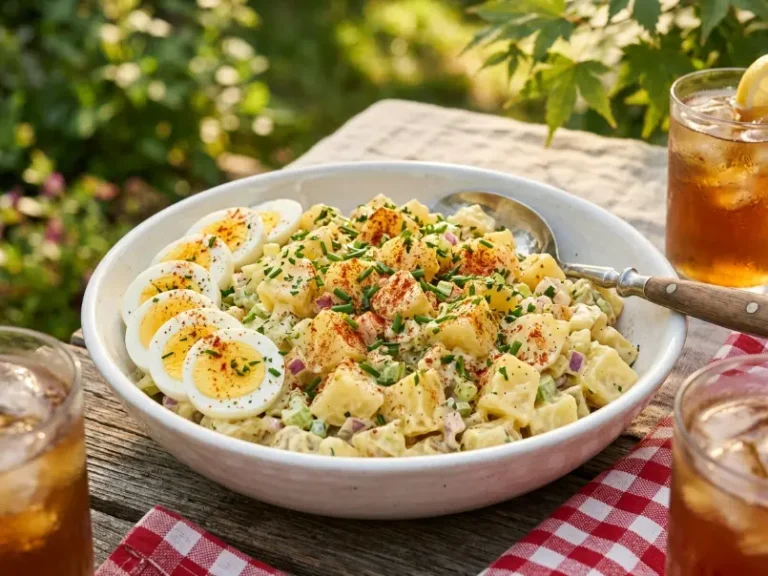
Classic American Potato Salad
Another crowd-pleasing summer BBQ side
Charred Mexican Street Corn (Elote)
Grilled vegetable perfection in a different flavor profile
For More Healthy Recipes Visit: flavourbazar.com