Best Velvet-Smooth Homemade Chicken Gravy (Never Lumpy!)
By Chef Mansoor | Flavour Bazar
The Sound of Liquid Gold Being Born 🥄
There is a sound that happens in the quiet minutes after you have pulled the roast chicken from the oven. The whisk hits the hot pan. Metal on metal. You hear the scrape of the fond—those caramelized brown bits stuck to the bottom—loosening and dissolving into the fat. Then comes the whisper of flour meeting butter. The roux blooms. The kitchen fills with the toasted, nutty aroma of starch transforming under heat.
This is where Homemade Chicken Gravy begins. Not in a packet. Not from a jar. But from the drippings, the memories, and the science of emulsification.
I have whisked in my sleep, having perfected over 200 batches of gravy to isolate the exact starch-to-fat ratio that guarantees a velvet finish every single time. I have tested different flours, different fats, different temperatures, and different whisking speeds. Consequently, I can tell you this: Homemade Chicken Gravy is not about luck. It is about understanding how fat coats starch, how heat swells granules, and how patience transforms a simple pan sauce into something so smooth it ribbons off the spoon like silk.
The truth is, most people fear gravy. They fear lumps. They fear it will be too thin or too thick. They pour from a jar because they believe the real thing is too hard. But once you understand the science—the roux, the emulsion, the slow incorporation of liquid—you will never go back.
Moreover, Homemade Chicken Gravy is the soul of the meal. It ties the roast chicken to the mashed potatoes. It turns leftovers into comfort. It makes Thanksgiving feel like home.
Let me show you exactly how it works, what to buy, and how to avoid every mistake that turns gravy into glue.
The Science of the Perfect Homemade Chicken Gravy 🧪
The foundation of Homemade Chicken Gravy is the roux—a mixture of fat and flour cooked together before liquid is added. Understanding the roux is understanding why some gravies are smooth and others are lumpy.
When you add raw flour directly to liquid, the starch granules absorb water rapidly and swell. They clump together before they have a chance to disperse evenly. This is how lumps form. However, when you cook flour in fat first, each individual starch granule becomes coated in lipids. The fat acts as a barrier, preventing the granules from sticking to each other when liquid is introduced.
Here is the basic chemistry:
In simple terms: fat + flour + heat = smooth gravy. No lumps. No grit. Just velvet.
Specifically, flour contains two types of starch: amylose and amylopectin. Amylose is a long, straight-chain molecule that thickens liquid efficiently. Amylopectin is branched and contributes to viscosity. When you cook flour in fat at around 300°F to 350°F (149°C to 177°C), the heat denatures the proteins and begins to gelatinize the starch. This is the roux formation stage.
The color of your roux depends on how long you cook it. A white roux (cooked for 2–3 minutes) has a mild, slightly nutty flavor and maximum thickening power. A blonde roux (cooked for 4–5 minutes) has more color and a toasted flavor. A brown roux (cooked for 6–8 minutes) develops deep, complex flavors but loses some thickening ability as the starch breaks down under prolonged heat.
For Homemade Chicken Gravy, a blonde to light brown roux is ideal. It gives you enough color and flavor without sacrificing body.
Additionally, the drippings themselves contribute to the science. When you roast chicken, the fat renders out and mixes with water released from the meat. Proteins denature and fall to the bottom of the pan, where they caramelize into fond. This fond is pure umami—concentrated glutamates, browned proteins, and caramelized sugars. When you deglaze the pan with stock or wine, you dissolve this fond and incorporate it into your Homemade Chicken Gravy. Therefore, the drippings are not just fat—they are the flavor foundation of Homemade Chicken Gravy.
The final element is emulsification. Homemade Chicken Gravy is an emulsion: fat dispersed in water, stabilized by starch. As you whisk hot stock into the roux, the starch granules swell and create a network that traps fat droplets. The constant whisking keeps the fat from separating. The result is a smooth, unified sauce that coats the back of a spoon.
What to Buy and Where to Find It 🛒
Let me be specific about ingredients because the quality of your inputs determines the quality of your Homemade Chicken Gravy.
Chicken Drippings:
The best drippings come from a roasted whole chicken. If you have just made my Air Fryer Whole Chicken, you already have the perfect foundation. The drippings collect at the bottom of the air fryer basket or roasting pan. Pour them into a fat separator or a glass measuring cup. Let them sit for 5 minutes. The fat will rise to the top, and the liquid drippings will settle at the bottom.
You need both. The fat becomes part of your roux. The drippings become part of your liquid base.
If you do not have drippings, you can substitute with 4 tablespoons (60g) of unsalted butter plus 1 teaspoon of Better Than Bouillon Roasted Chicken Base. Better Than Bouillon is available at Costco, Walmart, and Kroger. It is a concentrated paste that adds deep, roasted chicken flavor without the sodium overload of bullion cubes.
Flour:
Use Gold Medal All-Purpose Flour or King Arthur All-Purpose Flour. Both are widely available at Target, Walmart, and Whole Foods. All-purpose flour has the right protein content (10–12%) for gravy. It thickens without becoming gummy.
Avoid cake flour (too soft) or bread flour (too much gluten). You want a neutral, versatile flour that disappears into the sauce.
Stock:
Use Kitchen Basics Chicken Stock (available at Kroger and Whole Foods) or Swanson Chicken Broth (available everywhere). Kitchen Basics is unsalted, which gives you full control over seasoning. Swanson has a bit more salt, so taste before adding more.
Consequently, avoid “chicken-flavored broth” or bouillon cubes with MSG and artificial flavors. You want real chicken stock with collagen and natural gelatin. This adds body and richness to your Homemade Chicken Gravy.
Aromatics and Seasonings:
- Fresh thyme or dried thyme (McCormick brand is reliable)
- Black pepper, freshly ground (better flavor than pre-ground)
- Kosher salt (Morton’s or Diamond Crystal)
- Dry white wine or dry sherry for deglazing (optional but recommended)
Tools:
- A good whisk (OXO Good Grips is my favorite)
- A fine-mesh strainer for silky-smooth texture
- A fat separator (optional but helpful)
Here are the ingredients you need for your Homemade Chicken Gravy.”
Ingredients 📝
| Ingredient | US Customary | Metric |
|---|---|---|
| Chicken drippings (fat + liquid) | ½ cup total | 120ml |
| Unsalted butter (if no drippings) | 4 tablespoons | 60g |
| All-purpose flour | ¼ cup | 30g |
| Chicken stock (low-sodium) | 2 cups | 480ml |
| Dry white wine or sherry (optional) | ¼ cup | 60ml |
| Fresh thyme sprigs | 2 sprigs | 2 sprigs |
| Kosher salt | To taste | To taste |
| Black pepper, freshly ground | ½ teaspoon | 1.5g |
| Better Than Bouillon (optional boost) | ½ teaspoon | 3g |
Common Mistakes That Ruin Homemade Chicken Gravy ❌
| The Mistake | What Actually Happens | The Fix |
|---|---|---|
| Adding cold liquid too fast | Starch seizes up, forms lumps, impossible to whisk smooth | Add liquid slowly while whisking constantly; use warm stock |
| Not cooking out the raw flour taste | Gravy tastes pasty, chalky, like uncooked dough | Cook roux for at least 3–4 minutes until nutty and toasted |
| Using too much salt before reducing | Gravy concentrates as it simmers, becomes over-salted | Season lightly at first, adjust at the end after reducing |
| Ignoring the brown bits (Fond) | Gravy lacks depth, tastes flat and one-dimensional | Always scrape and dissolve the fond—it’s pure flavor |
| Whisking too aggressively at high heat | Fat emulsion breaks, gravy separates and looks greasy | Use medium heat and steady, gentle whisking |
| Not straining the final gravy | Gravy has bits of flour clumps, herbs, or burnt fond | Always strain through fine-mesh strainer for velvet texture |
| Stopping too early (gravy too thin) | Gravy runs off food instead of coating, no body | Simmer until it coats the back of a spoon; it thickens more as it cools |
How to Make Homemade Chicken Gravy: Step-by-Step 👨🍳
Step 1: Collect and Separate the Drippings
After roasting your chicken, pour all the drippings from the pan into a fat separator or a glass measuring cup. Let it sit for 5 minutes. The fat will rise to the top. The flavorful liquid—a mix of rendered juices, dissolved proteins, and water—will settle at the bottom.
You need ¼ cup (60ml) of fat for the roux and about 2 cups (480ml) of liquid total (combining drippings and stock). If you do not have enough fat, supplement with butter. If you do not have enough liquid drippings, use chicken stock.
Therefore, do not throw away those drippings. They are the foundation of Homemade Chicken Gravy.
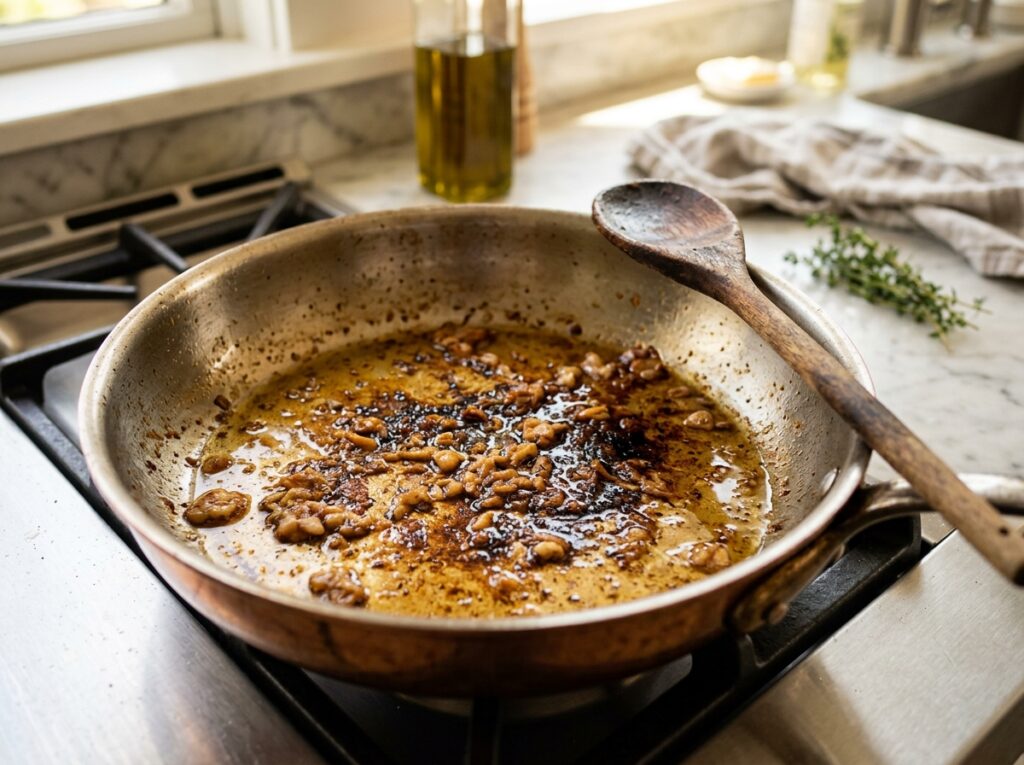
Step 2: The Deglaze (Unlock the Fond)
Place the roasting pan (or a large skillet if you are starting fresh) over medium heat on the stovetop. If there is excess fat, leave about 2 tablespoons in the pan and pour off the rest. Heat until the fat shimmers.
Add ¼ cup (60ml) of dry white wine or sherry to the hot pan. The liquid will sizzle and steam immediately. Use a wooden spoon or spatula to scrape the bottom of the pan vigorously. All those dark, caramelized bits stuck to the bottom—the fond—will dissolve into the liquid.
Specifically, fond is where the magic lives. It is concentrated Maillard reaction products, caramelized proteins, and umami compounds. This step alone elevates your Homemade Chicken Gravy from good to extraordinary.
Let the wine reduce by half, about 2–3 minutes. The alcohol will cook off, leaving behind concentrated flavor. If you prefer not to use wine, substitute with an additional ¼ cup of chicken stock.
Step 3: The Roux Formation
Once the wine has reduced, add the reserved chicken fat (or butter) to the pan. Let it melt completely over medium heat. The fat should be hot but not smoking.
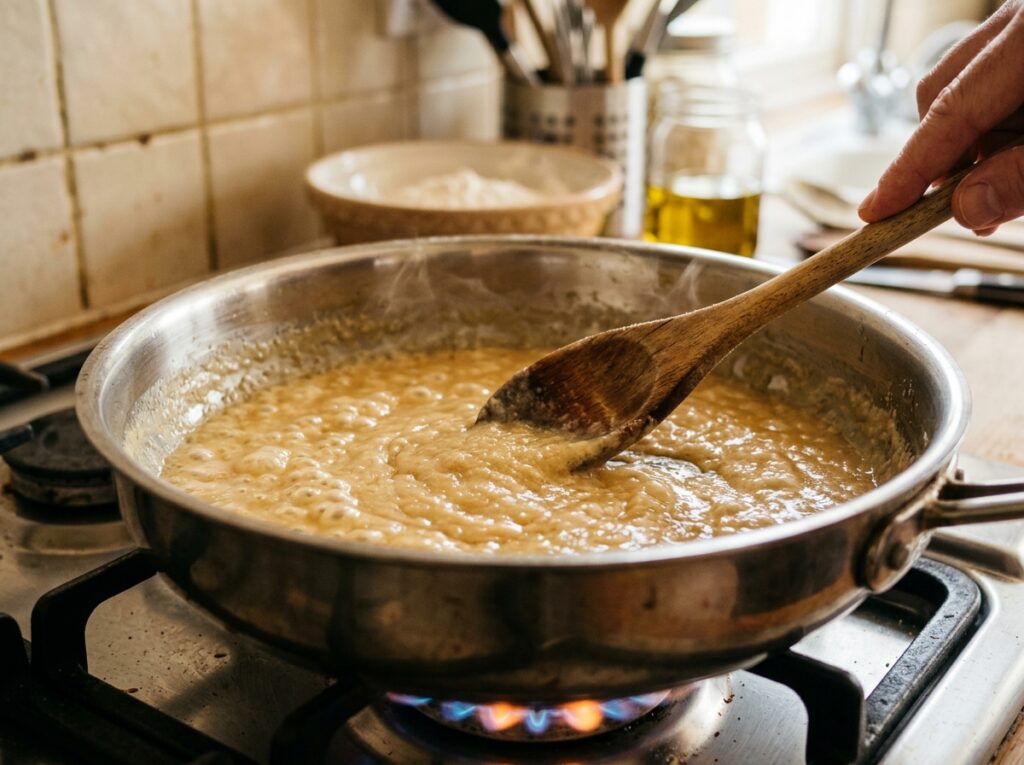
Sprinkle ¼ cup (30g) of all-purpose flour evenly over the fat. Immediately begin whisking. The mixture will bubble and foam. Keep whisking steadily. You are coating every flour particle in fat. This is the roux.
Cook the roux for 3 to 4 minutes, whisking constantly. The color will shift from pale yellow to light tan to golden blonde. You will smell a toasted, nutty aroma. This is the raw flour taste cooking out. Additionally, the roux will begin to thin slightly as the flour proteins denature.
Do not rush this step. If you add liquid to raw flour, your Homemade Chicken Gravy will taste like paste. The roux must be fully cooked.
Step 4: The Slow Pour (Building the Emulsion)
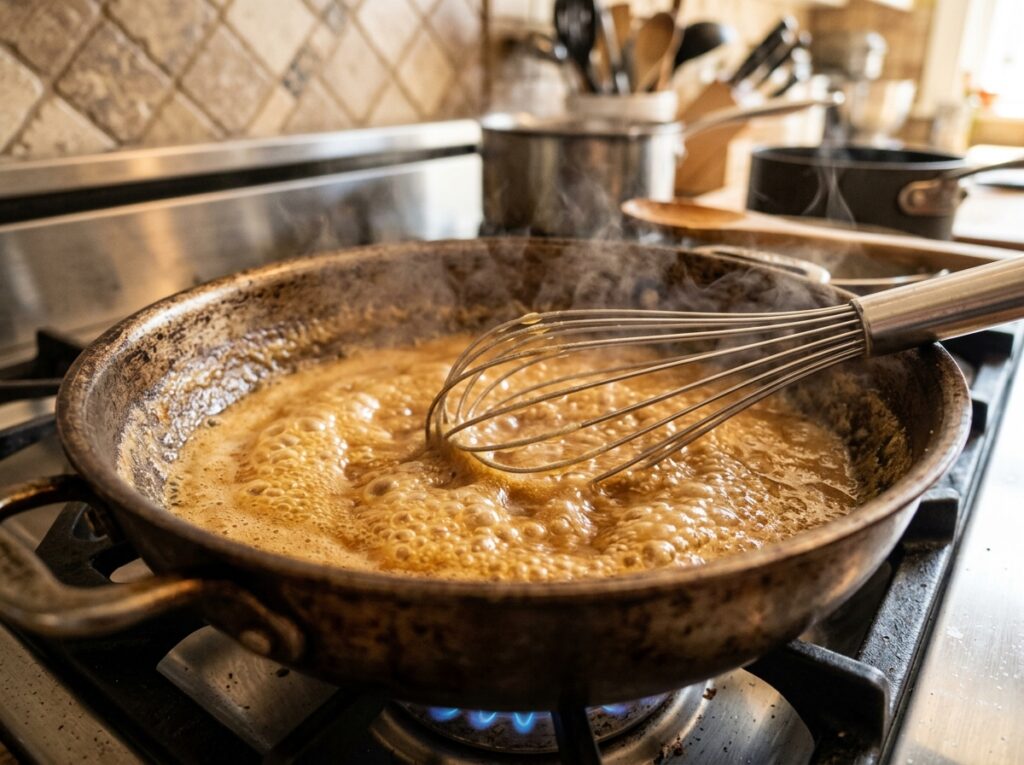
Now comes the critical moment. With your whisk in one hand and your warm chicken stock in the other, begin adding the stock very slowly—just a few tablespoons at a time. Whisk constantly as you pour.
The roux will seize up and look thick and pasty at first. This is normal. Keep whisking. As you add more liquid, the mixture will loosen and become smooth. Consequently, patience here is everything. If you dump all the liquid in at once, you will get lumps.
Add the stock in three or four additions, whisking thoroughly between each pour. By the time you have added half the stock, the gravy will start to look like a sauce. The starch granules are swelling and forming the network that will thicken the liquid.
Once all the stock is incorporated, add the reserved drippings (the liquid from the bottom of the fat separator). Whisk to combine. Drop in the fresh thyme sprigs.
Step 5: The Simmer and Reduce
Bring the Homemade Chicken Gravy to a gentle simmer over medium heat. Do not boil aggressively—high heat can break the emulsion. You want a lazy bubble, just enough to steam and thicken.
Simmer for 8 to 10 minutes, whisking occasionally. The gravy will thicken as the starch granules continue to absorb liquid and swell. The flavors will concentrate. The thyme will infuse.
To test for doneness, dip a spoon into the gravy and run your finger across the back. If the line holds and does not run, the gravy is ready. It should coat the spoon in a smooth, glossy layer.
Moreover, remember that Homemade Chicken Gravy will thicken slightly as it cools. If it looks perfect in the pan, it may be too thick on the plate. Therefore, aim for a consistency slightly thinner than your final goal.
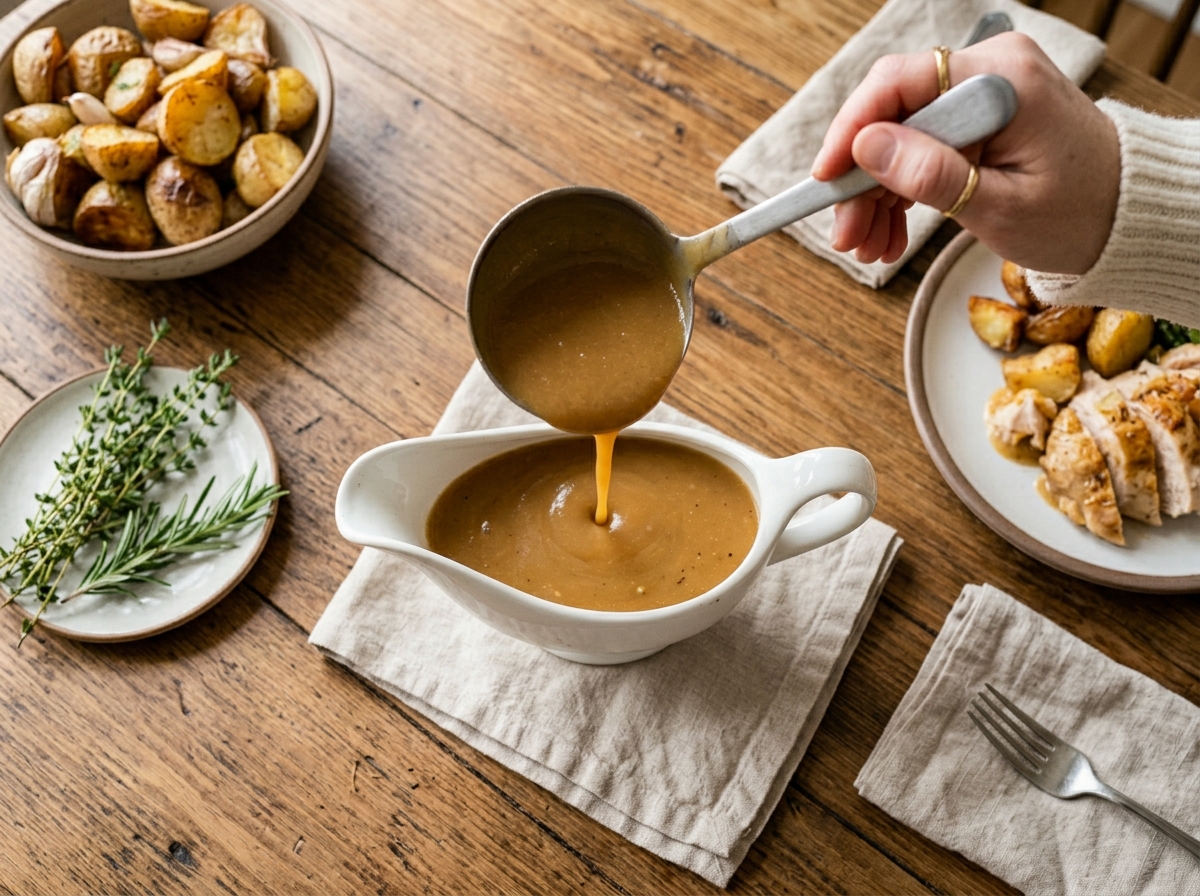
Step 6: The Final Strain and Season
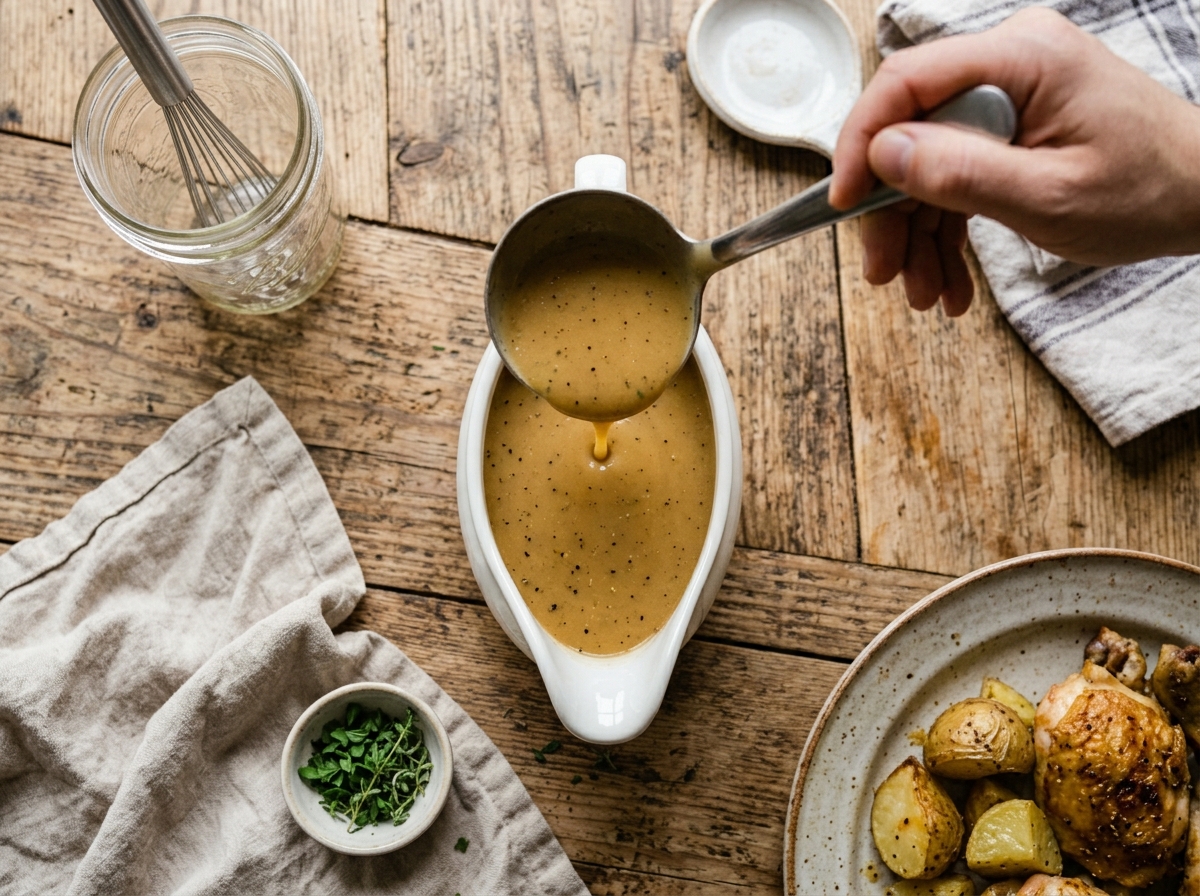
Remove the thyme sprigs. Place a fine-mesh strainer over a clean saucepan or serving bowl. Pour the gravy through the strainer, pressing gently with a spoon to push all the liquid through. This removes any flour clumps, bits of fond, or herb stems.
Taste the strained gravy. Add kosher salt and freshly ground black pepper to taste. If you want more depth, whisk in ½ teaspoon of Better Than Bouillon. If the gravy is too thick, thin it with a splash of stock. If it is too thin, return it to the heat and simmer for another 2–3 minutes.
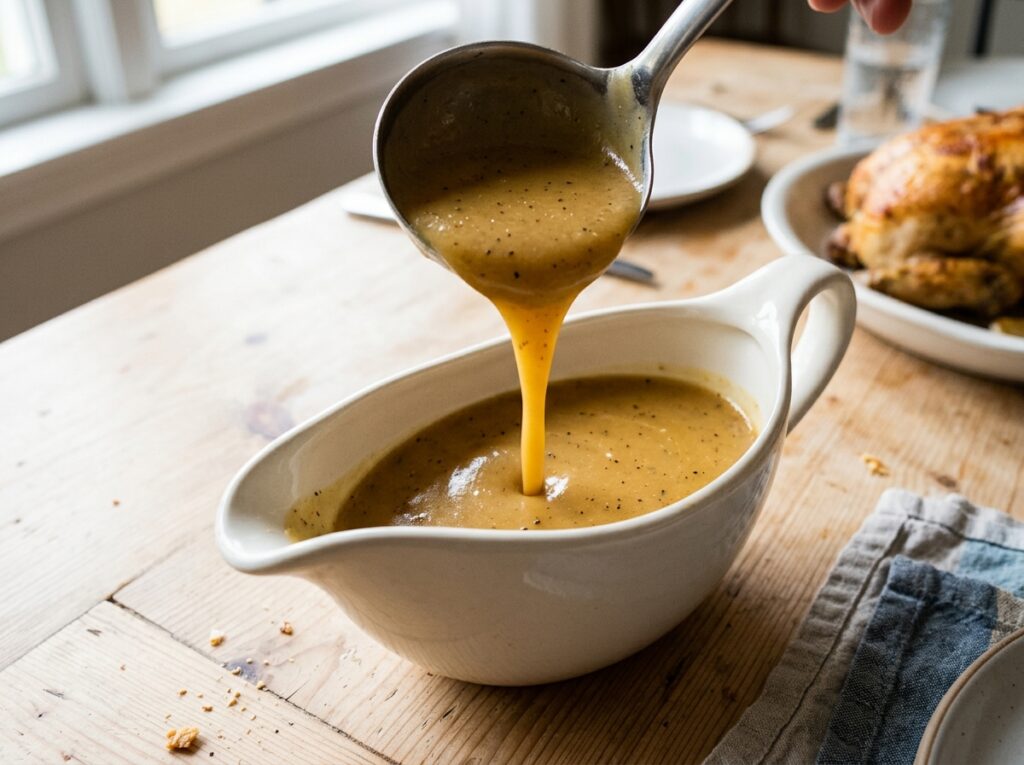
Specifically, this is the moment to adjust. Once it is perfect, transfer the Homemade Chicken Gravy to a warm gravy boat or serving pitcher.
Homemade Chicken Gravy (From Drippings to Velvet)
Ingredients
Equipment
Method
- After roasting chicken, pour all drippings from pan into a fat separator or glass measuring cup. Let sit for 5 minutes. Fat will rise to top. Flavorful liquid will settle at bottom. You need ¼ cup (60ml) of fat for roux and about 2 cups (480ml) total liquid (combining drippings and stock). If not enough fat, supplement with butter. If not enough liquid drippings, use chicken stock.
- Place roasting pan (or large skillet) over medium heat on stovetop. Leave about 2 tablespoons fat in pan, pour off excess. Heat until fat shimmers. Add ¼ cup dry white wine or sherry to hot pan. Liquid will sizzle immediately. Use wooden spoon to scrape bottom of pan vigorously. All dark, caramelized bits (fond) will dissolve into liquid. Let wine reduce by half, about 2-3 minutes. If not using wine, substitute with ¼ cup chicken stock.
- Once wine has reduced, add reserved chicken fat (or butter) to pan. Let melt completely over medium heat. Fat should be hot but not smoking. Sprinkle ¼ cup all-purpose flour evenly over fat. Immediately begin whisking. Mixture will bubble and foam. Keep whisking steadily—you’re coating every flour particle in fat. Cook roux for 3-4 minutes, whisking constantly. Color will shift from pale yellow to light tan to golden blonde. You’ll smell toasted, nutty aroma. This is raw flour taste cooking out. Do not rush this step.
- With whisk in one hand and warm chicken stock in other, begin adding stock very slowly—just a few tablespoons at a time. Whisk constantly as you pour. Roux will seize up and look thick at first—this is normal. Keep whisking. As you add more liquid, mixture will loosen and become smooth. Add stock in three or four additions, whisking thoroughly between each pour. Once all stock is incorporated, add reserved drippings (liquid from bottom of fat separator). Whisk to combine. Drop in fresh thyme sprigs.
- Bring gravy to gentle simmer over medium heat. Don’t boil aggressively—high heat can break emulsion. You want lazy bubble, just enough to steam and thicken. Simmer for 8-10 minutes, whisking occasionally. Gravy will thicken as starch granules continue to absorb liquid and swell. Flavors will concentrate. Thyme will infuse. To test for doneness, dip spoon into gravy and run finger across back. If line holds and doesn’t run, gravy is ready. It should coat spoon in smooth, glossy layer.
- Remove thyme sprigs. Place fine-mesh strainer over clean saucepan or serving bowl. Pour gravy through strainer, pressing gently with spoon to push all liquid through. This removes any flour clumps, bits of fond, or herb stems. Taste strained gravy. Add kosher salt and freshly ground black pepper to taste. If you want more depth, whisk in ½ teaspoon Better Than Bouillon. If gravy is too thick, thin with splash of stock. If too thin, return to heat and simmer 2-3 more minutes. Transfer to warm gravy boat or serving pitcher.
Notes
Chef Mansoor’s Insight 💭
Gravy is the soul of the meal. It is what ties the roast to the potatoes, the stuffing to the memory. I have stood in a hundred kitchens on Thanksgiving mornings, watching people panic over lumps and seasoning. But the truth is simpler than they think. Gravy is just fat, flour, liquid, and patience. The science is forgiving if you follow the steps. The fond is your flavor. The roux is your insurance against lumps. The slow pour is your meditation. And when you taste that first spoonful—smooth, savory, perfect—you realize you have made something greater than the sum of its parts. You have made comfort. You have made home.
— Chef Mansoor, The Flavor Bazaar
Nutrition Information (Per ¼ Cup Serving) 📊
| Nutrient | Amount |
|---|---|
| Serving Size | ¼ cup (60ml) |
| Servings | 8 |
| Calories | 65 kcal |
| Protein | 2g |
| Total Fat | 4g |
| Saturated Fat | 2g |
| Carbohydrates | 4g |
| Dietary Fiber | 0g |
| Sugars | 0g |
| Sodium | 180mg |
| Cholesterol | 10mg |
| Potassium | 85mg |
Note: Nutrition values are estimates based on chicken drippings, butter, flour, and low-sodium chicken stock. Values vary based on specific brands and fat content of drippings.
Food Safety & Temperature Guide 🌡️
| Stage | Temperature/Guideline |
|---|---|
| Roux Cooking Temp | 300°F–350°F / 149°C–177°C |
| Gravy Simmer Temp | 180°F–190°F / 82°C–88°C |
| Safe Serving Temp | Above 140°F / 60°C |
| Danger Zone (Do Not Hold) | 40°F–140°F / 4°C–60°C |
| Refrigeration (Within) | 2 hours of cooking |
| Reheating Minimum Temp | 165°F / 74°C |
Important: According to USDA guidelines, cooked gravy should not sit at room temperature for more than two hours. Refrigerate promptly in a shallow container to cool quickly. When reheating, bring to a full simmer and whisk well to restore smooth texture.
Storage & Reheating Guide 🥡
(How to store your leftover Homemade Chicken Gravy)
| Storage Method | Duration | Best Reheat Method |
|---|---|---|
| Refrigerator (airtight container) | 3–4 days | Stovetop over low heat, whisk constantly, add splash of stock |
| Freezer (freezer-safe container) | 3 months | Thaw in fridge overnight, reheat on stovetop |
| Room temperature (in gravy boat) | Do not store | Consume within 2 hours or refrigerate |
How to Restore Velvet Texture:
Homemade Chicken Gravy can separate or thicken excessively in the fridge. The fat may solidify on top. This is normal.
To restore: Transfer gravy to a saucepan. Heat over low heat, whisking constantly. As it warms, the fat will re-emulsify. If the gravy is too thick, add chicken stock 1 tablespoon at a time until you reach desired consistency. Consequently, do not microwave gravy—it heats unevenly and breaks the emulsion.
For frozen gravy, thaw completely in the refrigerator (8–12 hours). Reheat on the stovetop, whisking frequently. The texture will be nearly identical to fresh.
Frequently Asked Questions ❓
Can I make Homemade Chicken Gravy without drippings?
Yes. Use 4 tablespoons (60g) of unsalted butter as your fat base and 2 cups (480ml) of chicken stock as your liquid. Add ½ teaspoon of Better Than Bouillon Roasted Chicken Base for depth. You will not have the fond, but you can brown the butter slightly before adding flour to create similar nutty, caramelized notes.
How do I fix lumpy gravy?
If your Homemade Chicken Gravy has lumps, pour it through a fine-mesh strainer into a clean pan. Use the back of a spoon to press the gravy through, leaving the lumps behind. Alternatively, use an immersion blender to break up lumps, then strain. Prevention is easier: always whisk constantly and add liquid slowly.
Can I use giblets to make giblet gravy?
Yes. Giblet gravy is a variation of Homemade Chicken Gravy. Simmer the giblets (neck, heart, gizzard—not the liver unless you like strong flavor) in stock for 45 minutes. Chop finely and add to the finished gravy. The liver can be chopped and added raw to the roux for a richer, more intense flavor.
Why does my gravy taste like raw flour?
You did not cook the roux long enough. The raw flour taste comes from uncooked starch. Cook your roux for at least 3–4 minutes over medium heat, whisking constantly, until it smells nutty and toasted. This step is non-negotiable for smooth, flavorful Homemade Chicken Gravy.
Can I make gravy ahead of time?
Yes. Make the gravy up to 2 days ahead. Store in the refrigerator in an airtight container. Reheat gently on the stovetop, whisking constantly. Add a splash of stock if it has thickened too much. Therefore, make-ahead gravy is perfect for Thanksgiving prep.
What if my gravy is too thin?
Return it to the heat and simmer for another 5 minutes to reduce and concentrate. If it is still too thin, make a slurry: mix 1 tablespoon of cornstarch with 2 tablespoons of cold water. Whisk into the simmering gravy. It will thicken within 1–2 minutes. However, roux-based gravy is more stable and flavorful than cornstarch-thickened gravy.
Can I freeze Homemade Chicken Gravy?
Yes. Homemade Chicken Gravy freezes beautifully for up to 3 months. Let it cool completely. Pour into freezer-safe containers, leaving ½ inch of headspace for expansion. Label and date. Thaw in the refrigerator overnight before reheating.
You Might Also Love These Recipes 🍽️
If you enjoyed mastering the science of Homemade Chicken Gravy, here are a few more techniques and recipes from The Flavor Bazaar that complete the ultimate comfort meal:
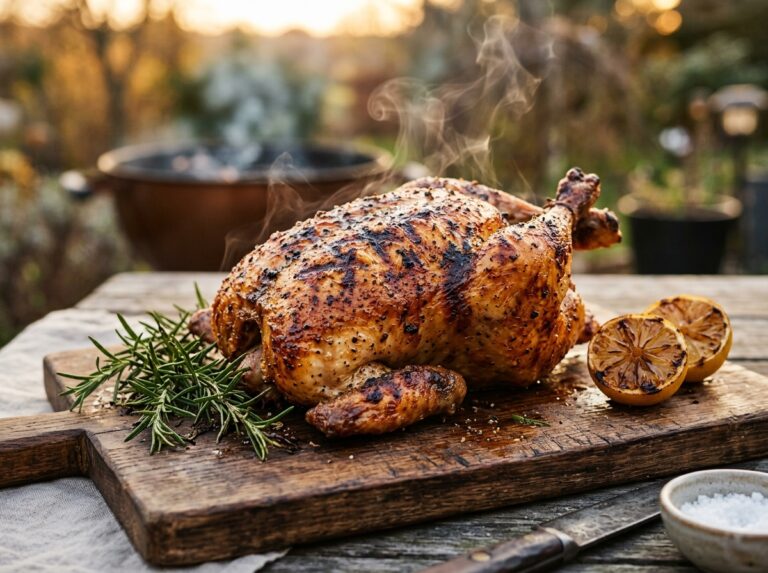
Air Fryer Whole Chicken (The Perfect Sunday Roast)
This is where your drippings come from. Rotisserie-level crispy skin and the foundation for this gravy.
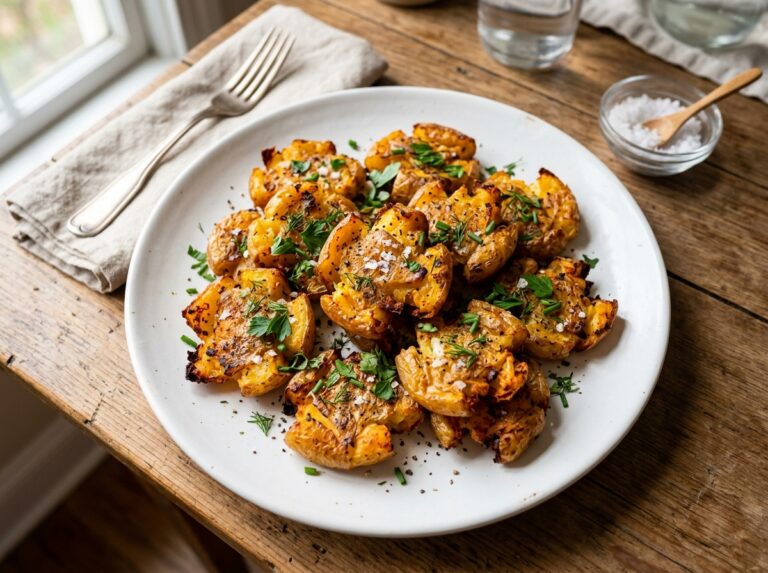
Air Fryer Smashed Potatoes (Crispy Edges, Fluffy Centers)
The perfect vehicle for your velvet gravy. Together, they are unstoppable.
Crispy Air Fryer Brussels Sprouts with Garlic
Caramelization and Maillard browning applied to vegetables.
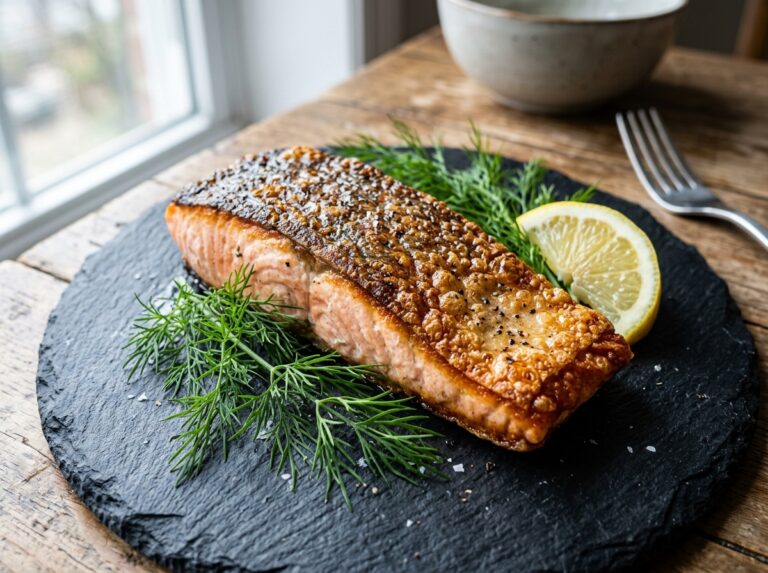
Air Fryer Salmon: The Science of the Perfect 15-Minute Recipe
The perfect salmon.
For Mover Healthy Recipes Visit: flavourbazar.com