The Best 243-Layer Flaky Buttermilk Biscuits: Science-Backed Recipe
By Chef Mansoor | Flavour Bazar
The Moment When Butter Becomes Air 🥐
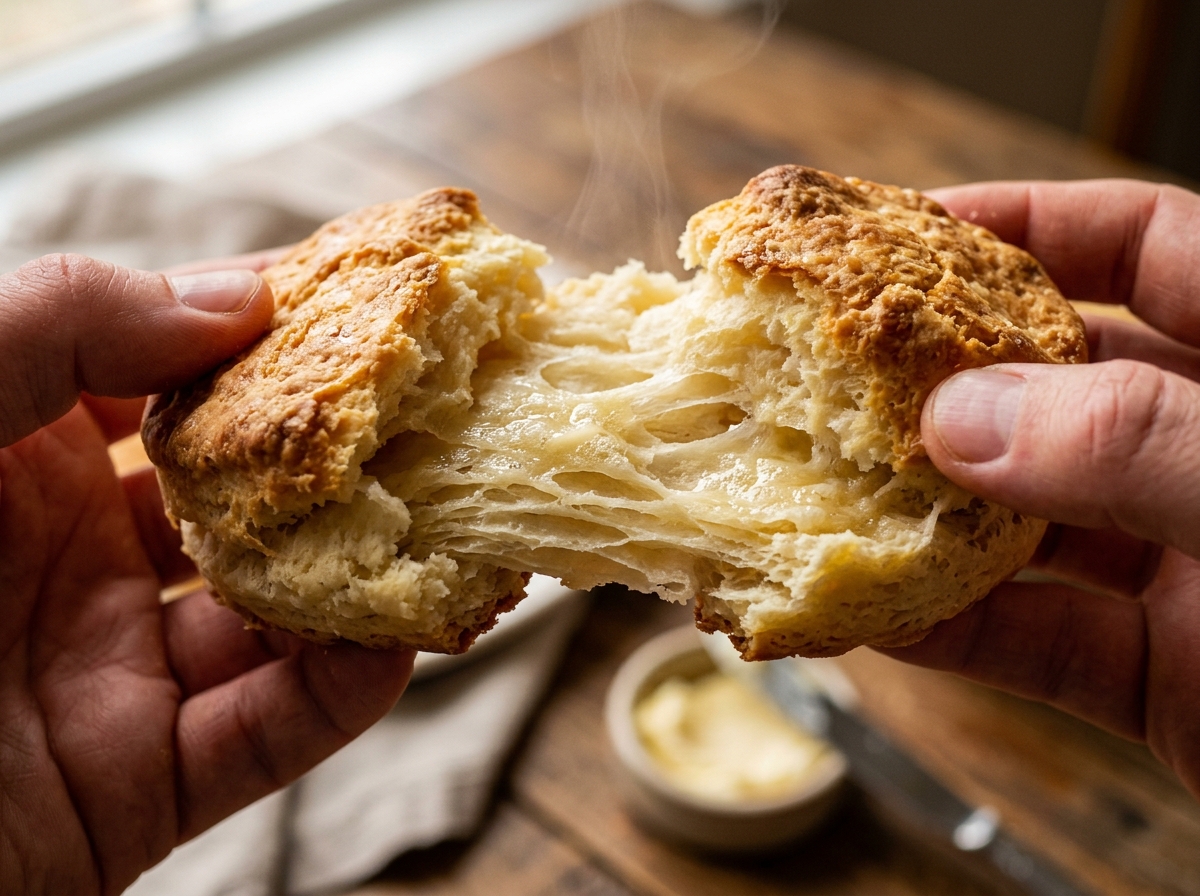
You hear it before you see it. The sound of the biscuit top cracking—a gentle fracture as the golden crust gives way. Then comes the steam. It rises from the center in visible wisps, carrying with it the scent of toasted flour and browned butter. You pull the Buttermilk Biscuits apart, and the layers separate like pages in a book. Each one is paper-thin, glistening with fat, impossibly light.
This is not luck. This is physics.
I have spent years in the “Flour Lab,” testing the precise impact of butter temperature on crumb structure to ensure these Buttermilk Biscuits rise to their full potential every single time. I have measured dough temperatures at every stage. I have photographed cross-sections under magnification to study layer formation. I have baked hundreds of batches at varying oven temperatures to isolate the exact moment when steam expansion creates maximum lift.
Consequently, I can tell you this: the secret to Buttermilk Biscuits with sky-high flaky biscuit layers is not in your hands—it is in understanding how cold fat, liquid, and heat interact at the molecular level.
Moreover, Buttermilk Biscuits are the foundation of Southern comfort food. They are the vehicle for sausage gravy, the companion to fried chicken, the centerpiece of breakfast tables across America. When you master the cold butter technique and the lamination process, you transform simple ingredients—flour, fat, liquid—into something that feels like edible architecture.
Specifically, this guide will show you exactly how to make Buttermilk Biscuits that shatter when you bite them, that pull apart in delicate sheets, that taste like tradition and science working together in perfect harmony.
The Science of Flaky Buttermilk Biscuits: Steam Expansion Explained 🧪
To understand how to make perfect Buttermilk Biscuits, you must first understand the relationship between fat, water, and heat.
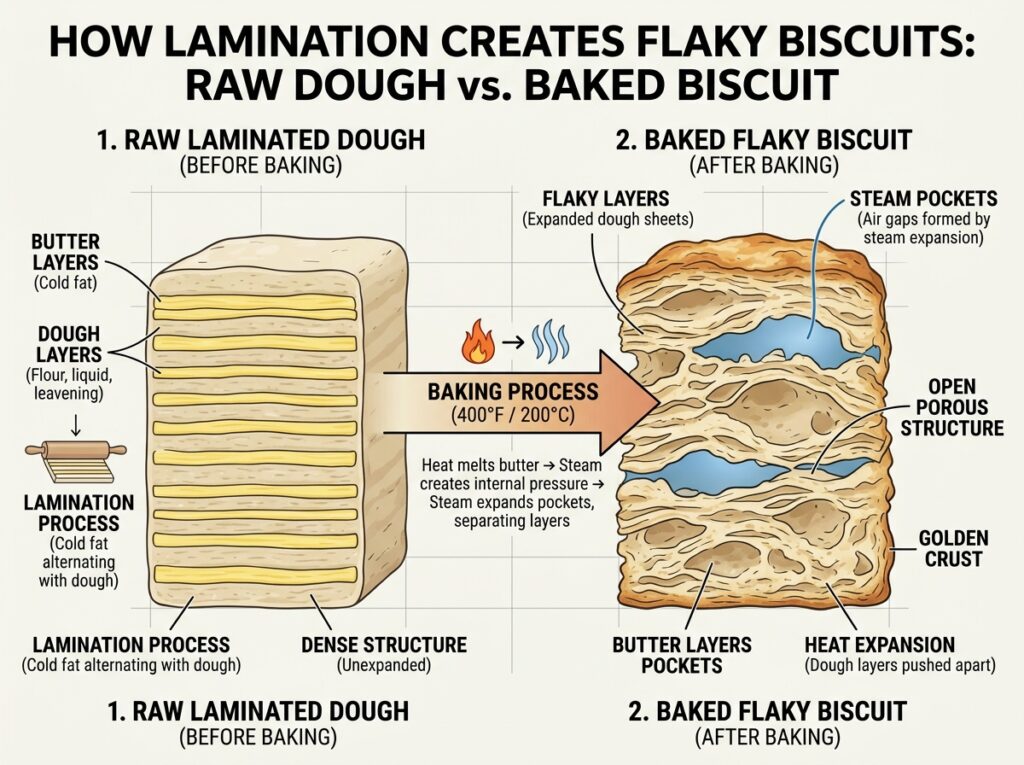
The flakiness in Buttermilk Biscuits comes from a process called steam expansion. Here is how it works:
When you incorporate cold butter into flour, you create discrete pockets of fat distributed throughout the dough. These pockets are solid at room temperature. When the dough hits a hot oven (typically 425°F to 450°F / 218°C to 232°C), two things happen simultaneously:
- The water in the butter evaporates rapidly, turning to steam. Steam occupies approximately 1,600 times more volume than liquid water at the same temperature. This explosive expansion pushes the flour layers apart, creating air pockets.
- The fat melts and coats the newly separated layers, waterproofing them and preventing them from collapsing back together.
Additionally, the buttermilk in the dough contributes its own moisture, which also turns to steam. The leavening agents in baking (baking powder and, in some recipes, baking soda) release carbon dioxide gas, adding even more lift.
Here is the fundamental relationship:
Cold Fat+High Heat=Steam Expansion (Layers)
In simple terms: cold butter has water trapped inside it. When that water boils, it creates pressure that physically lifts the dough into layers before the butter fully melts.
However, if the butter is too warm when it goes into the oven, it melts before the water can turn to steam. The result is a dense, greasy biscuit with no layers. Therefore, temperature control is everything in Buttermilk Biscuits.
Furthermore, the method of incorporating the butter matters. If you cream the butter into the flour (like in a cake), you create a uniform emulsion with no distinct fat pockets. If you leave the butter in large, discrete pieces and use a technique called lamination (folding the dough multiple times), you create hundreds of alternating layers of dough and fat. These layers separate dramatically in the oven, producing the tall, flaky structure that defines Southern style biscuits.
The acid in buttermilk also plays a role. It reacts with baking soda (if used) to create carbon dioxide bubbles. Additionally, the acid weakens gluten development, keeping the biscuits tender rather than tough. Consequently, Buttermilk Biscuits have a softer crumb than biscuits made with regular milk or water.
What to Buy and Where to Find It: USA Biscuit Ingredients Guide 🛒
Let me be specific about sourcing because the quality and type of ingredients you use will determine whether your Buttermilk Biscuits rise tall or stay flat.
Flour Selection
White Lily Flour is the gold standard for Southern style biscuits. It is a soft winter wheat flour with a lower protein content (around 8–9%) compared to all-purpose flour (10–12%). Lower protein means less gluten development, which translates to more tender, flaky biscuit layers.
Where to buy: White Lily is available at Kroger, Publix, and Walmart in the Southern United States. If you live outside the South, it is available on Amazon.
Alternative: If you cannot find White Lily, use King Arthur Pastry Flour (available at Whole Foods, Target, and online). It has a similar protein content and produces excellent results.
Do not use bread flour. The high protein content will make your Buttermilk Biscuits tough and chewy instead of tender and flaky.
Self-Rising vs All-Purpose Flour
Traditional Southern Buttermilk Biscuits often use self-rising flour, which is all-purpose flour with baking powder and salt already mixed in. This simplifies the recipe but gives you less control over leavening and seasoning.
For this recipe, I recommend all-purpose or pastry flour with separate additions of baking powder and salt. This allows you to control the exact ratios and achieve consistent results.
Butter
Use Kerrygold Unsalted Butter (available at Target, Whole Foods, Trader Joe’s, and Costco). Kerrygold has a higher butterfat content (82% vs. 80% in American butter), which means more flavor and better steam expansion.
Critical: The butter must be cold. Ideally, it should come straight from the refrigerator and be grated or cut just before use. Some bakers even freeze the butter for 15 minutes before incorporating it.
Buttermilk
Use whole buttermilk, not low-fat. The fat contributes to tenderness and flavor. Daisy Brand and Organic Valley are widely available at Kroger, Walmart, and Whole Foods.
If you do not have buttermilk, you can make a substitute by adding 1 tablespoon of white vinegar or lemon juice to 1 cup of whole milk. Let it sit for 5 minutes to curdle. However, real buttermilk has a thicker consistency and tangier flavor that improves the final texture of Buttermilk Biscuits.
Leavening Agents
Use Bob’s Red Mill Baking Powder (aluminum-free, available at Whole Foods, Target, Amazon) or Clabber Girl Baking Powder (available everywhere).
Additionally, some recipes include baking soda along with baking powder. The baking soda reacts with the acid in buttermilk to create extra lift and browning. Use Arm & Hammer Baking Soda (available at all grocery stores).
Tools
- Pastry cutter (OXO Good Grips Dough Blender, available at Target and Amazon)
- Box grater (for grating cold butter—the secret weapon)
- 2½-inch biscuit cutter (metal, not plastic—available at Williams Sonoma, Sur La Table, or Amazon)
- Bench scraper (for folding and laminating the dough)
- Rolling pin (preferably French-style tapered rolling pin)
Ingredients for Buttermilk Biscuits 📝
This recipe makes 10 to 12 biscuits (2½-inch diameter).
| Ingredient | US Customary | Metric |
|---|---|---|
| All-purpose flour or pastry flour | 2½ cups | 300g |
| Baking powder | 1 tablespoon | 12g |
| Baking soda | ½ teaspoon | 3g |
| Kosher salt | 1 teaspoon | 6g |
| Granulated sugar (optional) | 1 teaspoon | 4g |
| Unsalted butter, very cold | 8 tablespoons (1 stick) | 115g |
| Buttermilk, cold | 1 cup | 240ml |
| Melted butter (for brushing) | 2 tablespoons | 30g |
Common Mistakes That Ruin Buttermilk Biscuits ❌
| The Mistake | What Actually Happens | The Fix |
|---|---|---|
| Overworking the dough (gluten development) | Biscuits become tough, dense, and chewy instead of tender | Mix just until combined; dough should be shaggy, not smooth |
| Using warm butter | Butter melts into dough before steam can form; no layers, greasy texture | Butter must be refrigerator-cold; grate or cut just before use |
| Twisting the biscuit cutter (sealing the edges) | Edges seal, preventing rise; biscuits stay short | Press straight down and lift straight up—no twisting motion |
| Not preheating the oven long enough | Insufficient initial heat; biscuits spread instead of rise | Preheat oven for full 15 minutes at 450°F before baking |
| Skipping the lamination step | No distinct layers; biscuits are crumbly but not flaky | Fold dough 4-5 times (letter folds) to create hundreds of layers |
| Using low-fat buttermilk | Less tender crumb, less flavor, drier texture | Always use whole buttermilk, not low-fat or fat-free |
| Placing biscuits too far apart on pan | Sides don’t support each other; biscuits spread wide instead of tall | Place biscuits touching or ½ inch apart so they rise upward together |
| Over-flouring the work surface | Dry dough, tough texture, throws off liquid ratio | Use minimal flour; brush off excess before cutting |
How to Make Buttermilk Biscuits: Step-by-Step 👨🍳
Step 1: Chill Everything (The Foundation of Flakiness)
Before you even measure flour, place your mixing bowl, pastry cutter, and even the flour itself in the refrigerator for 15 minutes. Cold ingredients are the foundation of flaky biscuit layers.
Cut your cold butter into ½-inch cubes or, better yet, grate it using the large holes of a box grater. Grating creates smaller, more evenly distributed butter pieces that laminate beautifully. Return the grated butter to the refrigerator while you prepare the dry ingredients.
This step alone will improve your Buttermilk Biscuits more than any other technique change. Temperature control is everything.
Step 2: Mix the Dry Ingredients
In your chilled mixing bowl, whisk together 2½ cups (300g) flour, 1 tablespoon (12g) baking powder, ½ teaspoon (3g) baking soda, 1 teaspoon (6g) kosher salt, and 1 teaspoon (4g) sugar (if using).
The sugar is optional. It does not make the biscuits sweet—it promotes browning through the Maillard reaction and balances the tanginess of the buttermilk.
Step 3: The Butter Grating (Creating Fat Pockets)
Remove the grated butter from the refrigerator. Add it to the flour mixture. Using a pastry cutter or your fingertips (work quickly to avoid warming the butter), cut the butter into the flour until the mixture resembles coarse crumbs with pea-sized butter pieces still visible.
Do not overwork. You want distinct chunks of butter, not a uniform sandy texture. These chunks will create the steam pockets that form layers. Consequently, some recipes call for leaving butter pieces as large as lima beans. This is intentional.
If the butter starts to soften or your hands warm it too much, place the entire bowl back in the refrigerator for 5 minutes before proceeding.
Step 4: The Buttermilk Well (Gentle Hydration)
Make a well in the center of the flour-butter mixture. Pour 1 cup (240ml) of cold buttermilk into the well all at once.
Using a fork or your hands, stir gently from the center outward, gradually incorporating the flour into the buttermilk. Mix just until the dough comes together. It will be shaggy, sticky, and uneven. This is correct.
Do not knead. Do not stir until smooth. The dough should look rough and barely hold together. Overmixing develops gluten, which makes Buttermilk Biscuits tough instead of tender.
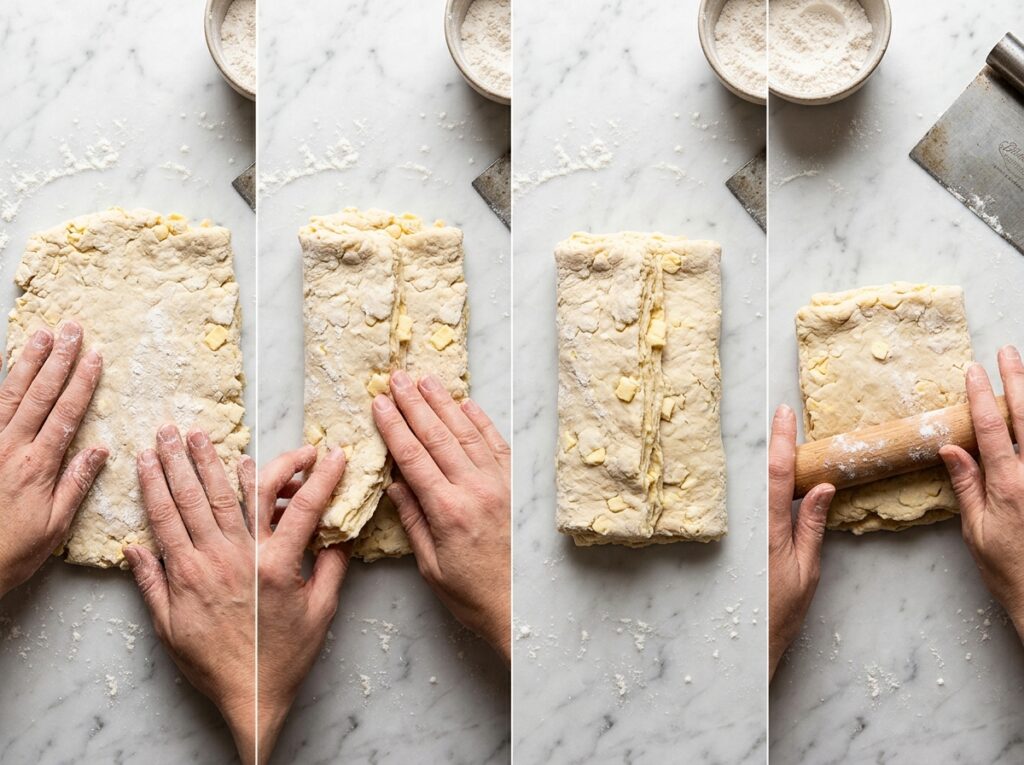
Step 5: The Letter Fold (Lamination for Layers)
Turn the shaggy dough out onto a lightly floured surface. Gently pat it into a rough rectangle about ¾ inch thick.
Now comes the lamination step that creates flaky biscuit layers.
Fold the dough like a letter: fold the bottom third up over the center, then fold the top third down over that. You now have three layers. Rotate the dough 90 degrees (a quarter turn).
Pat the dough back into a rectangle and repeat the letter fold. Rotate 90 degrees again. Repeat this process 4 to 5 times total. Each fold multiplies the number of layers exponentially.
Specifically:
- 1 fold = 3 layers
- 2 folds = 9 layers
- 3 folds = 27 layers
- 4 folds = 81 layers
- 5 folds = 243 layers
This is the cold butter technique in action. You are creating alternating layers of dough and butter. When the Buttermilk Biscuits hit the hot oven, steam will push these layers apart, creating the dramatic rise and flaky texture.
Moreover, be gentle. Do not press hard. You want to fold, not compress. The goal is to create layers, not to knead the dough.
Step 6: The Final Pat and Rest
After the final fold, gently pat the dough into a rectangle or circle about ¾ to 1 inch thick. Do not use a rolling pin aggressively—use your hands to press gently.
Let the dough rest for 5 minutes. This allows the gluten to relax, making cutting easier and preventing shrinkage.
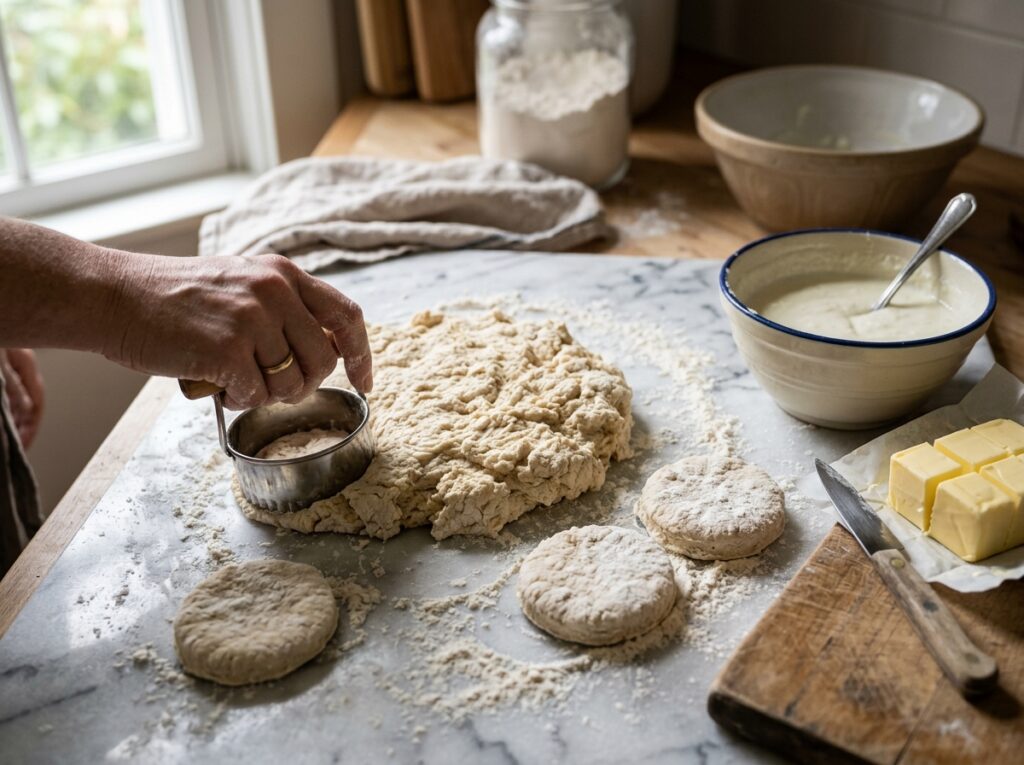
Step 7: The Vertical Cut (Preserving the Layers)
Using a 2½-inch biscuit cutter dipped in flour, press straight down through the dough in one firm motion. Do not twist the cutter. Twisting seals the edges and prevents the layers from separating during baking.
Lift the cutter straight up. Place the cut biscuit on a parchment-lined baking sheet. Repeat, cutting biscuits as close together as possible to minimize scraps.
Gather the scraps gently, press them together (do not re-fold or re-laminate), and cut additional biscuits. These “second cut” biscuits will not be quite as tall, but they are still delicious.
Place the biscuits on the baking sheet so they are just touching or within ½ inch of each other. This encourages them to rise upward instead of spreading outward. When Buttermilk Biscuits support each other, they rise taller.
Step 8: The Freeze Flash (Optional but Powerful)
For maximum rise, place the entire baking sheet of unbaked biscuits in the freezer for 10 minutes before baking. This ensures the butter is ice-cold when it hits the oven, maximizing steam expansion.
This step is optional, but it makes a noticeable difference in height.
Step 9: Bake Hot and Fast
Preheat your oven to 450°F (232°C). Make sure it has been preheating for at least 15 minutes—ovens lie about their temperature.
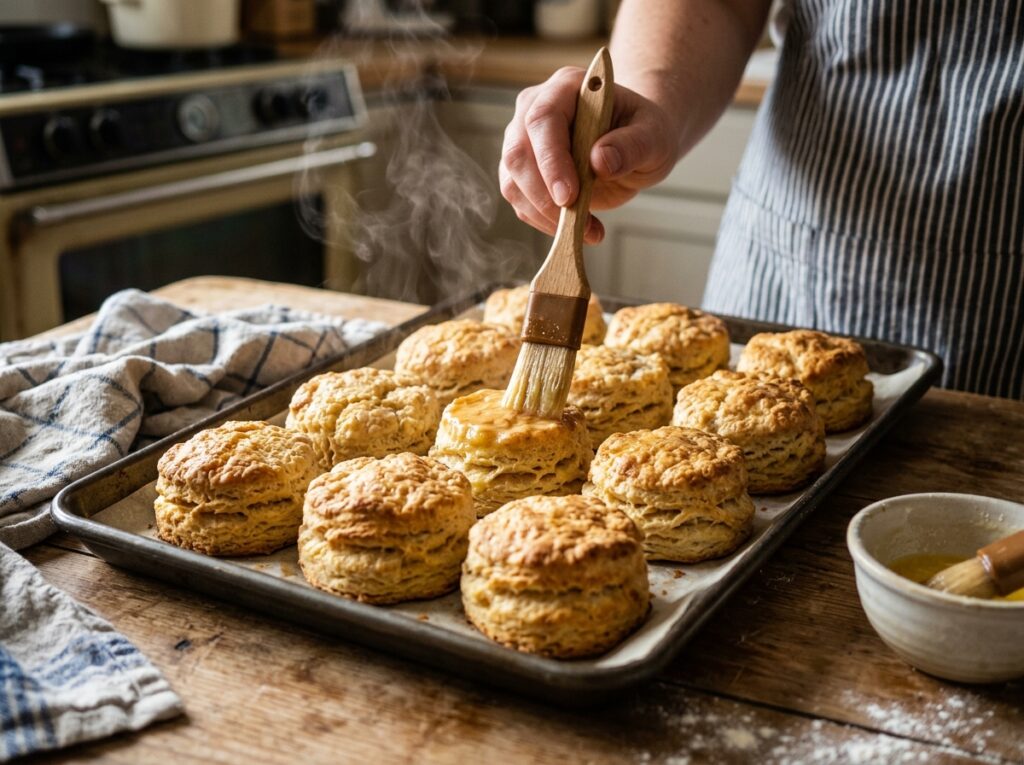
Brush the tops of the biscuits with melted butter. This promotes browning and adds flavor.
Bake for 12 to 15 minutes, or until the tops are deeply golden brown. The Buttermilk Biscuits should have risen dramatically, with visible layers separating at the sides.
Do not underbake. Pale biscuits are doughy inside. You want a deep golden color on top and slightly darker edges.
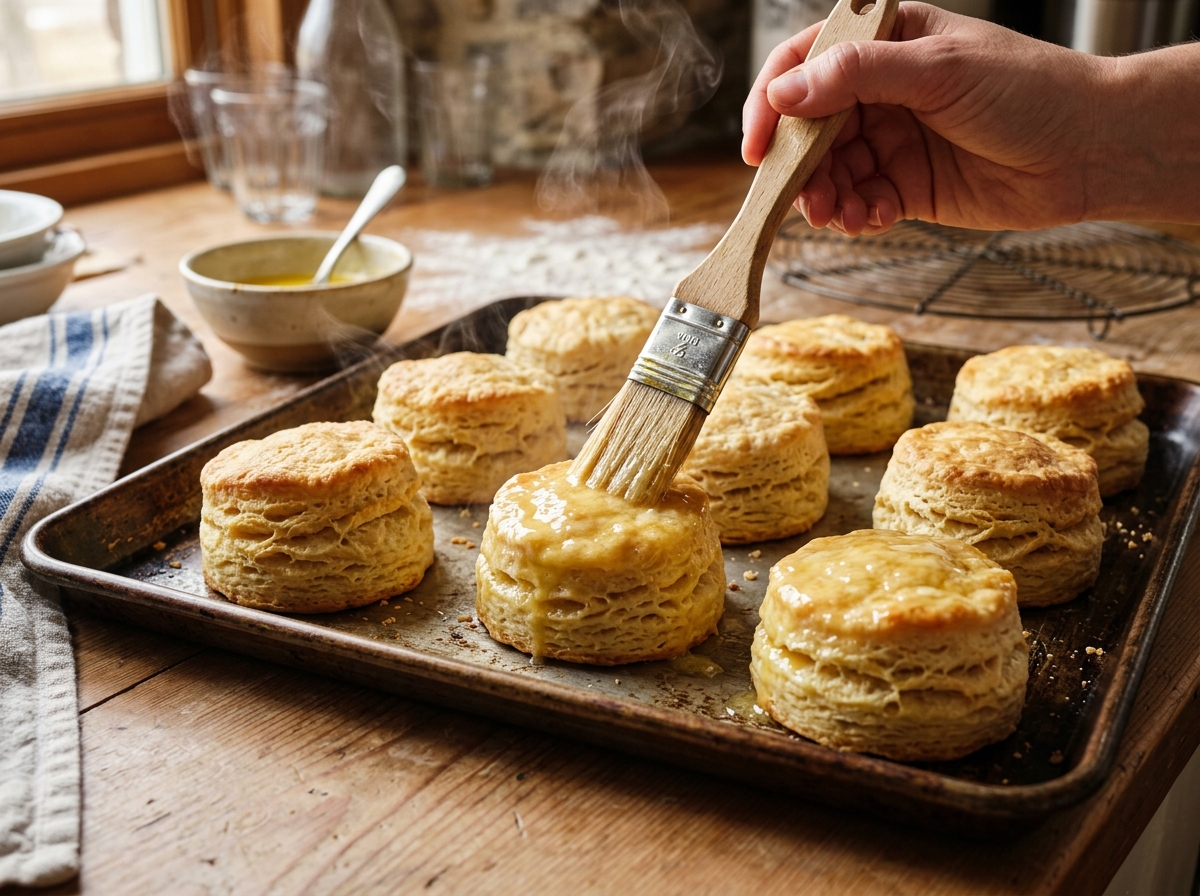
Remove from the oven and brush with more melted butter while still hot. The butter will soak into the crust, creating a glossy, flavorful finish.
Step 10: The Pull-Apart Test
Let the Buttermilk Biscuits cool for 2–3 minutes, just enough to handle. Then pull one apart horizontally. The layers should separate easily, revealing a fluffy, steaming interior with thin sheets of buttery dough.
This is the moment you have been working toward. This is the result of cold butter, gentle handling, lamination, and high heat working together in perfect harmony.
Serve immediately with butter, honey, jam, or gravy.
Buttermilk Biscuits (The Science of Flaky Layers)
Ingredients
Equipment
Method
- Place mixing bowl, pastry cutter, and even flour in refrigerator for 15 minutes. Cut cold butter into ½-inch cubes OR grate using large holes of box grater (grating creates smaller, more evenly distributed pieces for better lamination). Return grated butter to refrigerator while preparing dry ingredients. Temperature control is everything for flaky layers
- In chilled mixing bowl, whisk together 2½ cups flour, 1 tablespoon baking powder, ½ teaspoon baking soda, 1 teaspoon salt, and 1 teaspoon sugar (if using). Sugar is optional—it promotes browning through Maillard reaction and balances buttermilk tanginess.
- Remove grated butter from refrigerator. Add to flour mixture. Using pastry cutter or fingertips (work quickly to avoid warming butter), cut butter into flour until mixture resembles coarse crumbs with pea-sized butter pieces still visible. Do NOT overwork—you want distinct chunks of butter, not uniform sandy texture. These chunks create steam pockets that form layers. If butter starts to soften, refrigerate bowl for 5 minutes.
- Make well in center of flour-butter mixture. Pour 1 cup cold buttermilk into well all at once. Using fork or hands, stir gently from center outward, gradually incorporating flour into buttermilk. Mix just until dough comes together. It will be shaggy, sticky, and uneven—this is correct. Do NOT knead or stir until smooth. Overmixing develops gluten, making biscuits tough instead of tender.
- Turn shaggy dough onto lightly floured surface. Gently pat into rough rectangle about ¾ inch thick. Fold like a letter: fold bottom third up over center, then fold top third down over that. You now have 3 layers. Rotate dough 90 degrees (quarter turn). Pat back into rectangle and repeat letter fold. Rotate 90 degrees again. Repeat process 4-5 times total. Each fold multiplies layers exponentially: 1 fold = 3 layers, 2 folds = 9 layers, 3 folds = 27 layers, 4 folds = 81 layers, 5 folds = 243 layers. Be gentle—fold, don’t compress. Goal is to create layers, not knead dough.
- After final fold, gently pat dough into rectangle or circle about ¾ to 1 inch thick. Use hands to press gently—don’t roll aggressively. Let dough rest 5 minutes to allow gluten to relax, making cutting easier and preventing shrinkage.
- Using 2½-inch biscuit cutter dipped in flour, press straight down through dough in one firm motion. DO NOT TWIST the cutter—twisting seals edges and prevents layers from separating during baking. Lift cutter straight up. Place cut biscuit on parchment-lined baking sheet. Repeat, cutting biscuits as close together as possible to minimize scraps. Gather scraps gently, press together (don’t re-fold), and cut additional biscuits. Place biscuits so they’re just touching or within ½ inch of each other—this encourages upward rise instead of outward spread.
- For maximum rise, place entire baking sheet of unbaked biscuits in freezer for 10 minutes before baking. This ensures butter is ice-cold when it hits oven, maximizing steam expansion. This step is optional but makes noticeable difference in height
- Preheat oven to 450°F (232°C) for at least 15 minutes—ovens lie about temperature. Brush tops of biscuits with melted butter to promote browning. Bake 12-15 minutes, or until tops are deeply golden brown. Biscuits should have risen dramatically with visible layers separating at sides. Don’t underbake—pale biscuits are doughy inside. You want deep golden color on top and slightly darker edges. Remove from oven and brush with more melted butter while still hot. Butter will soak into crust, creating glossy, flavorful finish.
- Let biscuits cool 2-3 minutes, just enough to handle. Pull one apart horizontally. Layers should separate easily, revealing fluffy, steaming interior with thin sheets of buttery dough. This is result of cold butter, gentle handling, lamination, and high heat working together. Serve immediately with butter, honey, jam, or gravy.
Notes
Chef Mansoor’s Insight 💭
There is a kind of magic that happens when flour and butter meet heat. It is chemistry, yes—starch gelatinization, steam expansion, Maillard browning. But it is also legacy. My grandmother never talked about gluten development or lamination. She just knew that cold hands made better Buttermilk Biscuits. She knew that the dough should look rough, not smooth. She knew that you pressed the cutter straight down, never twisted. Science has given us the language to explain what she understood by instinct. But the result is the same: layers that separate like whispers, a crust that shatters, a center that steams. This is not just food. This is comfort made edible.
— Chef Mansoor, Flavour Bazar
Nutrition Information (Per Biscuit) 📊
| Nutrient | Amount |
|---|---|
| Serving Size | 1 biscuit (2½ inches) |
| Servings | 10-12 biscuits |
| Calories | 185 kcal |
| Protein | 4g |
| Total Fat | 9g |
| Saturated Fat | 5g |
| Carbohydrates | 22g |
| Dietary Fiber | 1g |
| Sugars | 2g |
| Sodium | 320mg |
| Cholesterol | 25mg |
| Calcium | 80mg |
| Iron | 1.5mg |
Note: Nutrition values are estimates based on all-purpose flour, Kerrygold unsalted butter, and whole buttermilk. Does not include additional butter for brushing.
Baking Temperature & Timing Guide 🌡️
| Stage | Temperature/Time |
|---|---|
| Oven Preheat Temp | 450°F / 232°C |
| Minimum Preheat Time | 15 minutes |
| Baking Temp | 450°F / 232°C |
| Baking Time | 12-15 minutes |
| Internal Temp When Done | 200°F / 93°C (center) |
| Butter Temp (Before Incorporation) | 35°F–40°F / 2°C–4°C (refrigerator cold) |
| Buttermilk Temp | 35°F–40°F / 2°C–4°C (cold from fridge) |
| Optional Freeze Flash Before Baking | 10 minutes in freezer |
Important: High heat is essential for Buttermilk Biscuits. Lower temperatures (below 425°F) cause the butter to melt before steam can form, resulting in flat, greasy biscuits.
Storage & Reheating Guide 🥡
| Storage Method | Duration | Best Reheat Method |
|---|---|---|
| Room temperature (in airtight container) | Same day | Oven at 350°F for 5-7 minutes |
| Refrigerator (in airtight container) | 2-3 days | Oven at 350°F for 8-10 minutes, wrapped in foil |
| Freezer (unbaked, after cutting) | 2 months | Bake from frozen at 450°F for 15-18 minutes |
| Freezer (baked, fully cooled) | 2 months | Thaw, then oven at 350°F for 10 minutes |
How to Keep Them Soft:
Buttermilk Biscuits are best eaten fresh, but if you must store them:
- Let them cool completely before storing to prevent condensation (which makes them soggy)
- Store in an airtight container or resealable bag
- To reheat, wrap in aluminum foil to trap steam and prevent drying out
- Add a small piece of damp paper towel to the container—the moisture will keep biscuits soft
Make-Ahead Tip: You can cut the biscuits, place them on a baking sheet, and freeze them solid. Transfer frozen unbaked biscuits to a freezer bag. Bake from frozen, adding 3–5 minutes to the baking time. This is perfect for Thanksgiving morning when you want fresh biscuits without the work.
Frequently Asked Questions ❓
Can I make Buttermilk Biscuits without buttermilk?
Yes, but the results will not be quite the same. You can substitute 1 cup whole milk + 1 tablespoon white vinegar or lemon juice. Let it sit for 5 minutes to curdle. However, real buttermilk has a thicker consistency and tangier flavor that improves texture and taste. Additionally, the acid in buttermilk reacts with baking soda to create extra lift.
Why are my Buttermilk Biscuits dense and not flaky?
The most common causes are:
- Butter too warm: Must be refrigerator-cold or even frozen
- Overworking the dough: Creates gluten, which makes biscuits tough
- Skipping lamination: Without letter folds, there are no layers
- Oven not hot enough: Low heat melts butter before steam forms
Can I use salted butter?
You can, but reduce the added salt to ½ teaspoon instead of 1 teaspoon. I prefer unsalted butter because it gives you full control over seasoning. Additionally, salted butter can have inconsistent salt levels between brands.
Do I need a biscuit cutter, or can I use a glass?
A metal biscuit cutter with a sharp edge is best. A glass or jar will work in a pinch, but the thick rim can compress the edges and prevent a clean rise. Moreover, make sure whatever you use is at least 2½ inches in diameter—smaller cutters make biscuits that dry out faster.
Why do my Buttermilk Biscuits spread instead of rise tall?
Three common causes:
- Butter too warm: Melts and spreads instead of steaming
- Oven not preheated enough: Insufficient initial heat shock
- Biscuits placed too far apart: They need to support each other; place them touching or very close
Can I add cheese or herbs to Buttermilk Biscuits?
Yes. Add ½ cup (60g) shredded sharp cheddar cheese or 2 tablespoons chopped fresh herbs (chives, rosemary, thyme) to the flour mixture before adding the butter. However, additions will slightly alter the texture—cheese makes them richer and denser, herbs add flavor but can create small holes in the layers.
What is the difference between Southern style biscuits and regular biscuits?
Southern style biscuits typically use soft wheat flour (like White Lily), which has lower protein content. This creates a more tender, delicate crumb. They also tend to be taller and flakier due to the cold butter technique and lamination. Northern or “drop” biscuits often use all-purpose flour and a wetter dough dropped by spoonfuls, resulting in a more rustic, less layered texture.
You Might Also Love These Recipes 🍽️
If you enjoyed mastering the science of Buttermilk Biscuits, here are a few more techniques and recipes from Flavour Bazar that will complete your comfort food repertoire:
Homemade Chicken Gravy (From Drippings to Velvet)
The perfect pairing for Buttermilk Biscuits. The roux method explained for smooth, rich gravy every time.
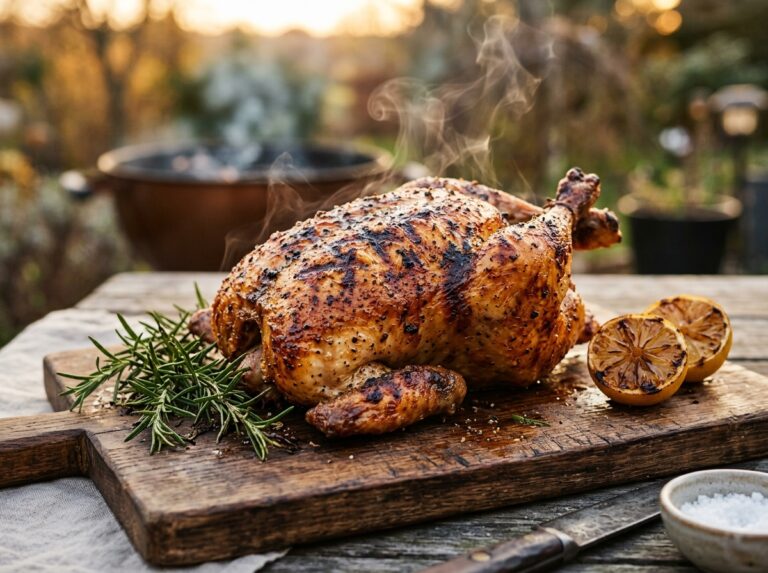
Air Fryer Whole Chicken (The Perfect Sunday Roast)
Create the drippings for your gravy and serve alongside these biscuits for the ultimate comfort meal.
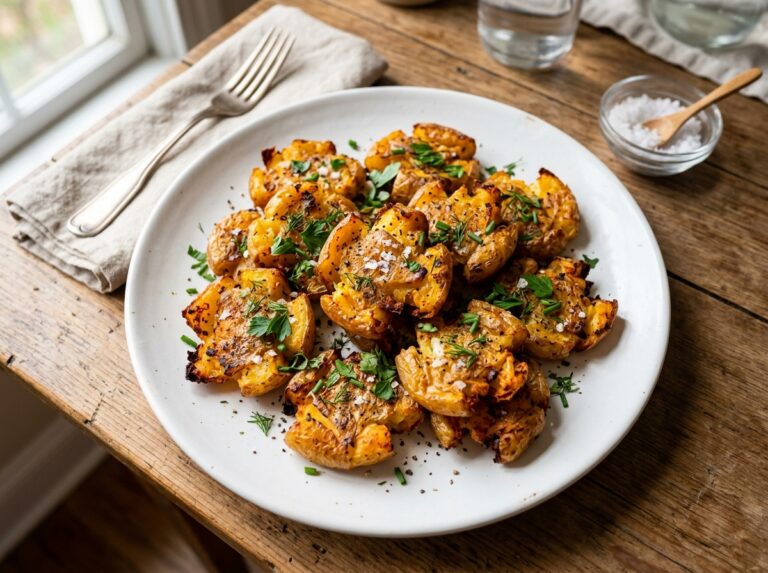
Air Fryer Smashed Potatoes (Crispy Edges, Fluffy Centers)
Another Southern side dish staple, perfected with science.
Crispy Air Fryer Brussels Sprouts with Garlic
Caramelization and Maillard browning applied to vegetables.
Air Fryer Salmon: The Science of the Perfect 15-Minute Recipe
The perfect salmon.
For More Healthy Recipes Visit: flavourbazar.com